Featured

Projects are ramping up!

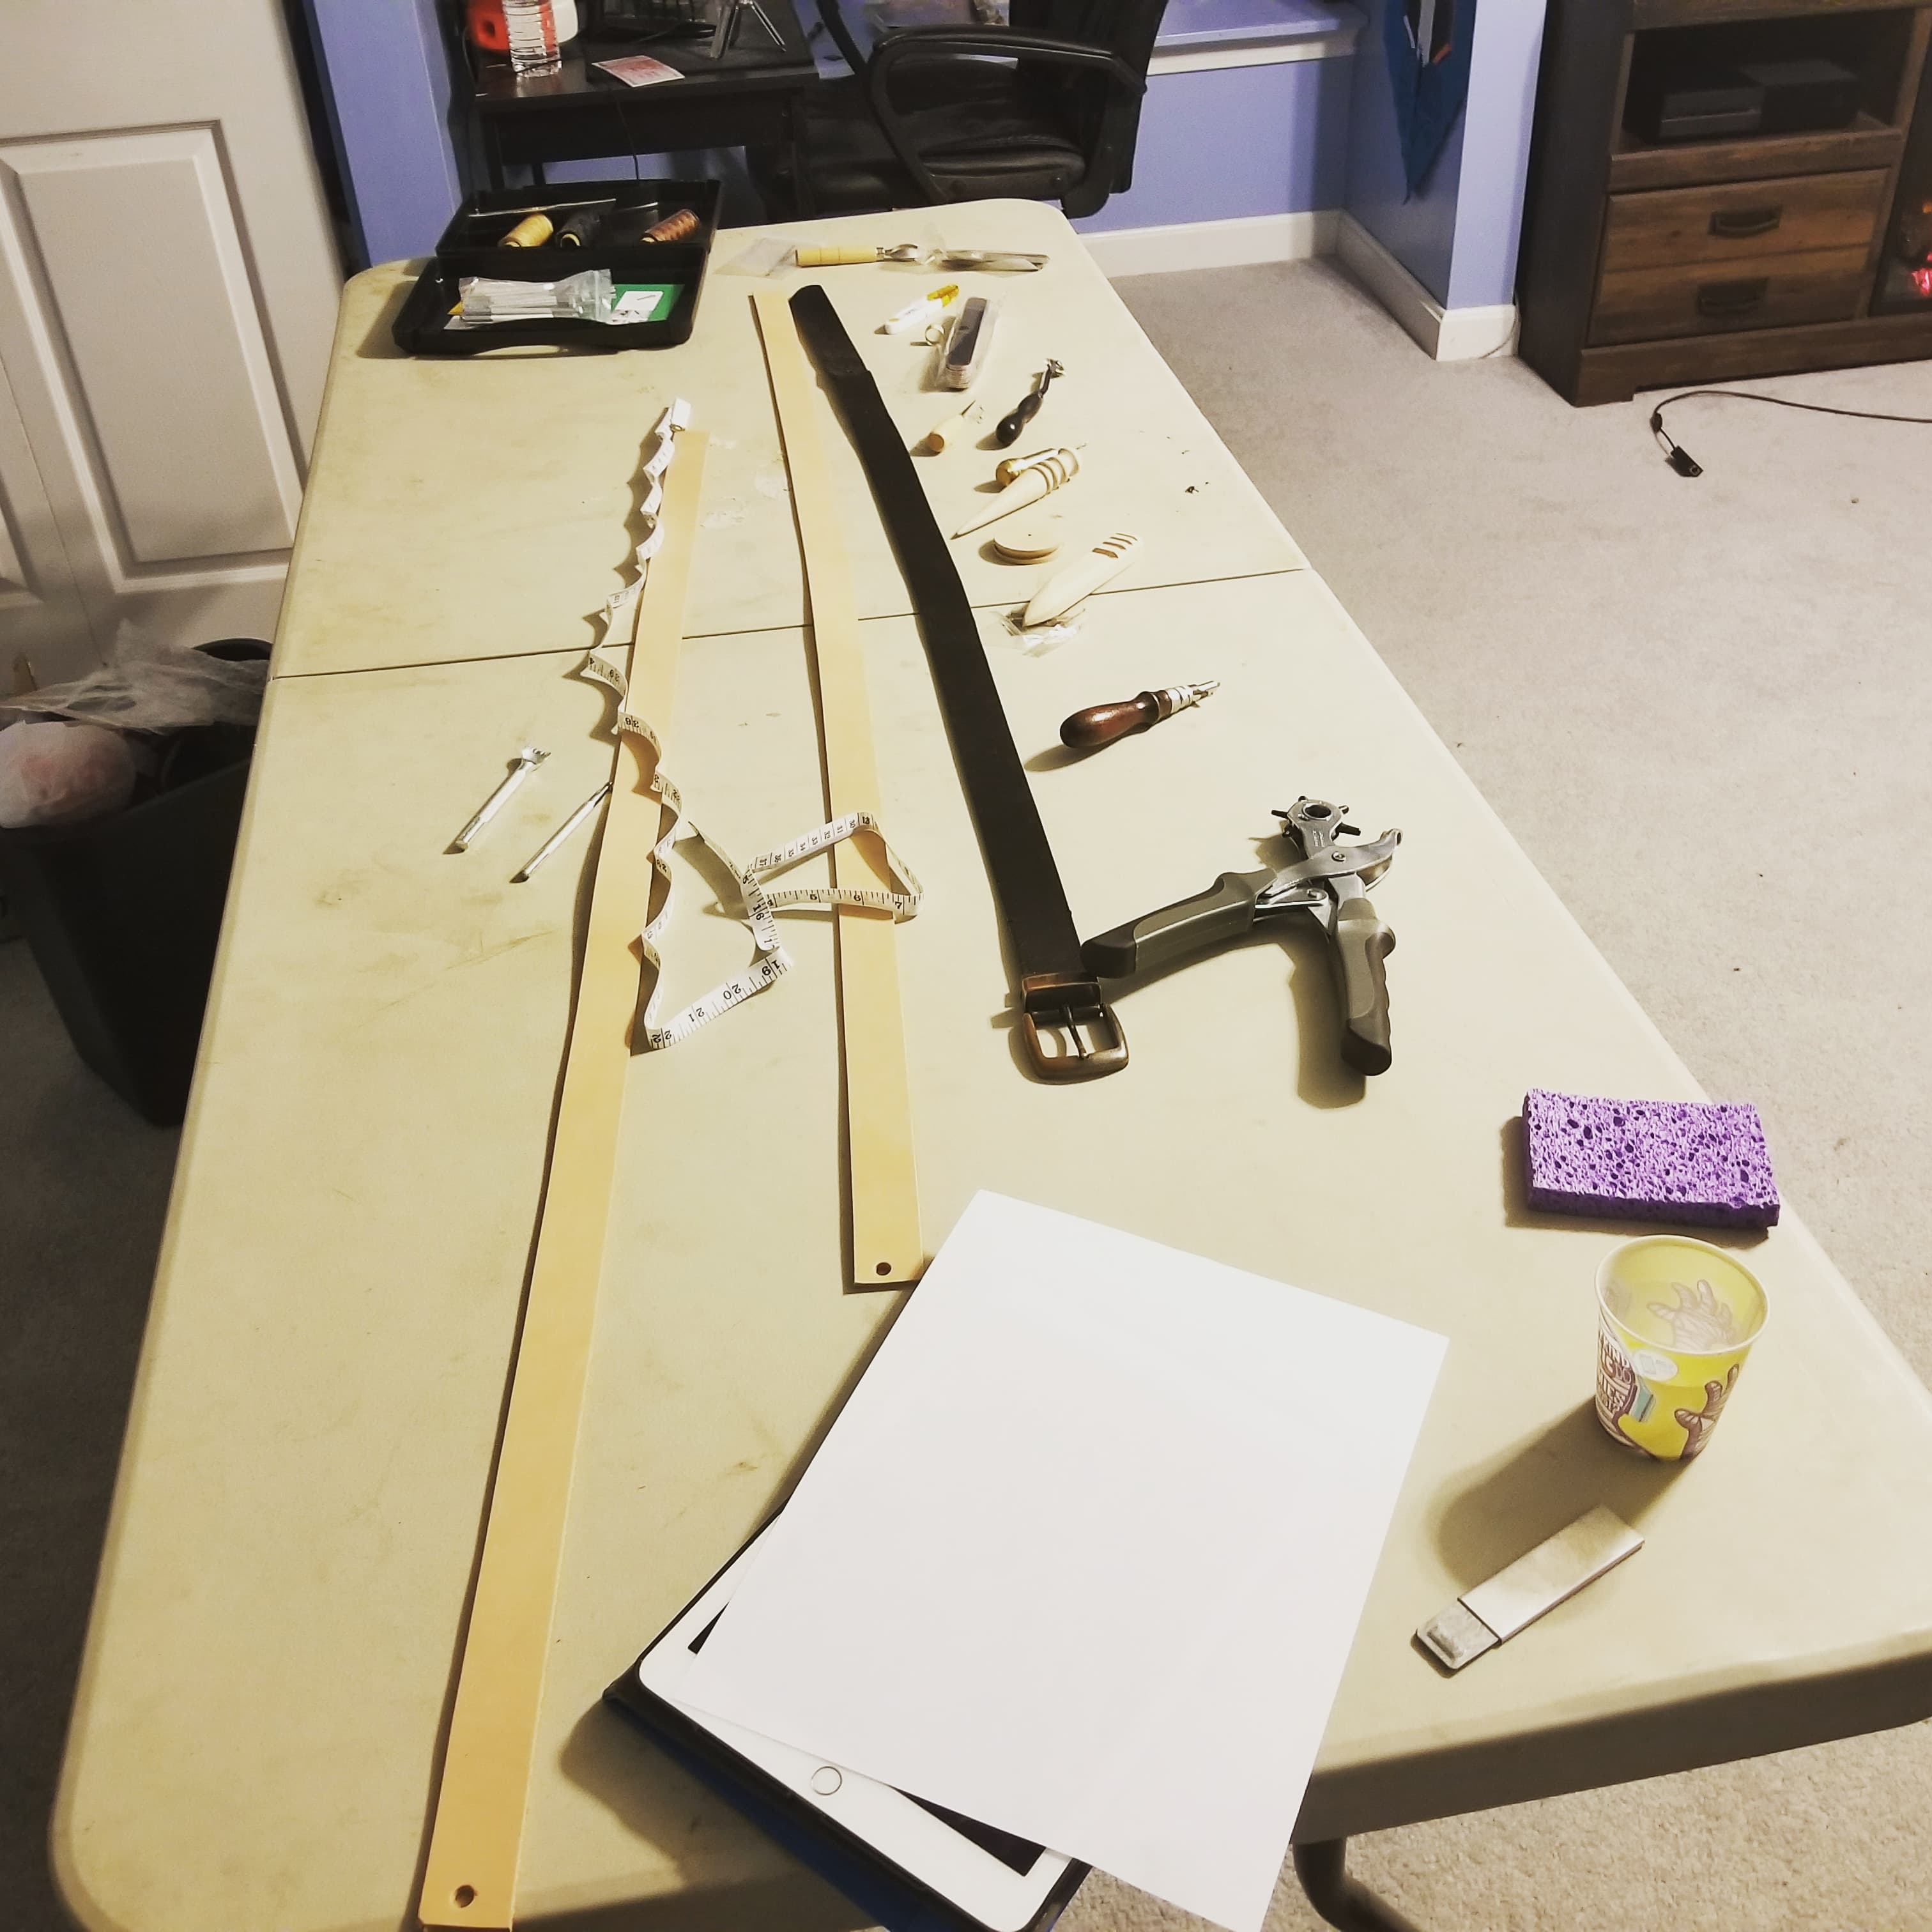
So, i’m starting to have more and more projects under my belt. Since I’ve started leather crafting I’ve completed a bracelet, cuffs, a small key chain, and a belt. However with that, I also have bracers, and a (hatchet) holster nearly complete as well. I’m pretty darn happy with the progress I’ve made in such short time. I’m going to do a quick summary of all of those projects I’ve worked on since starting.

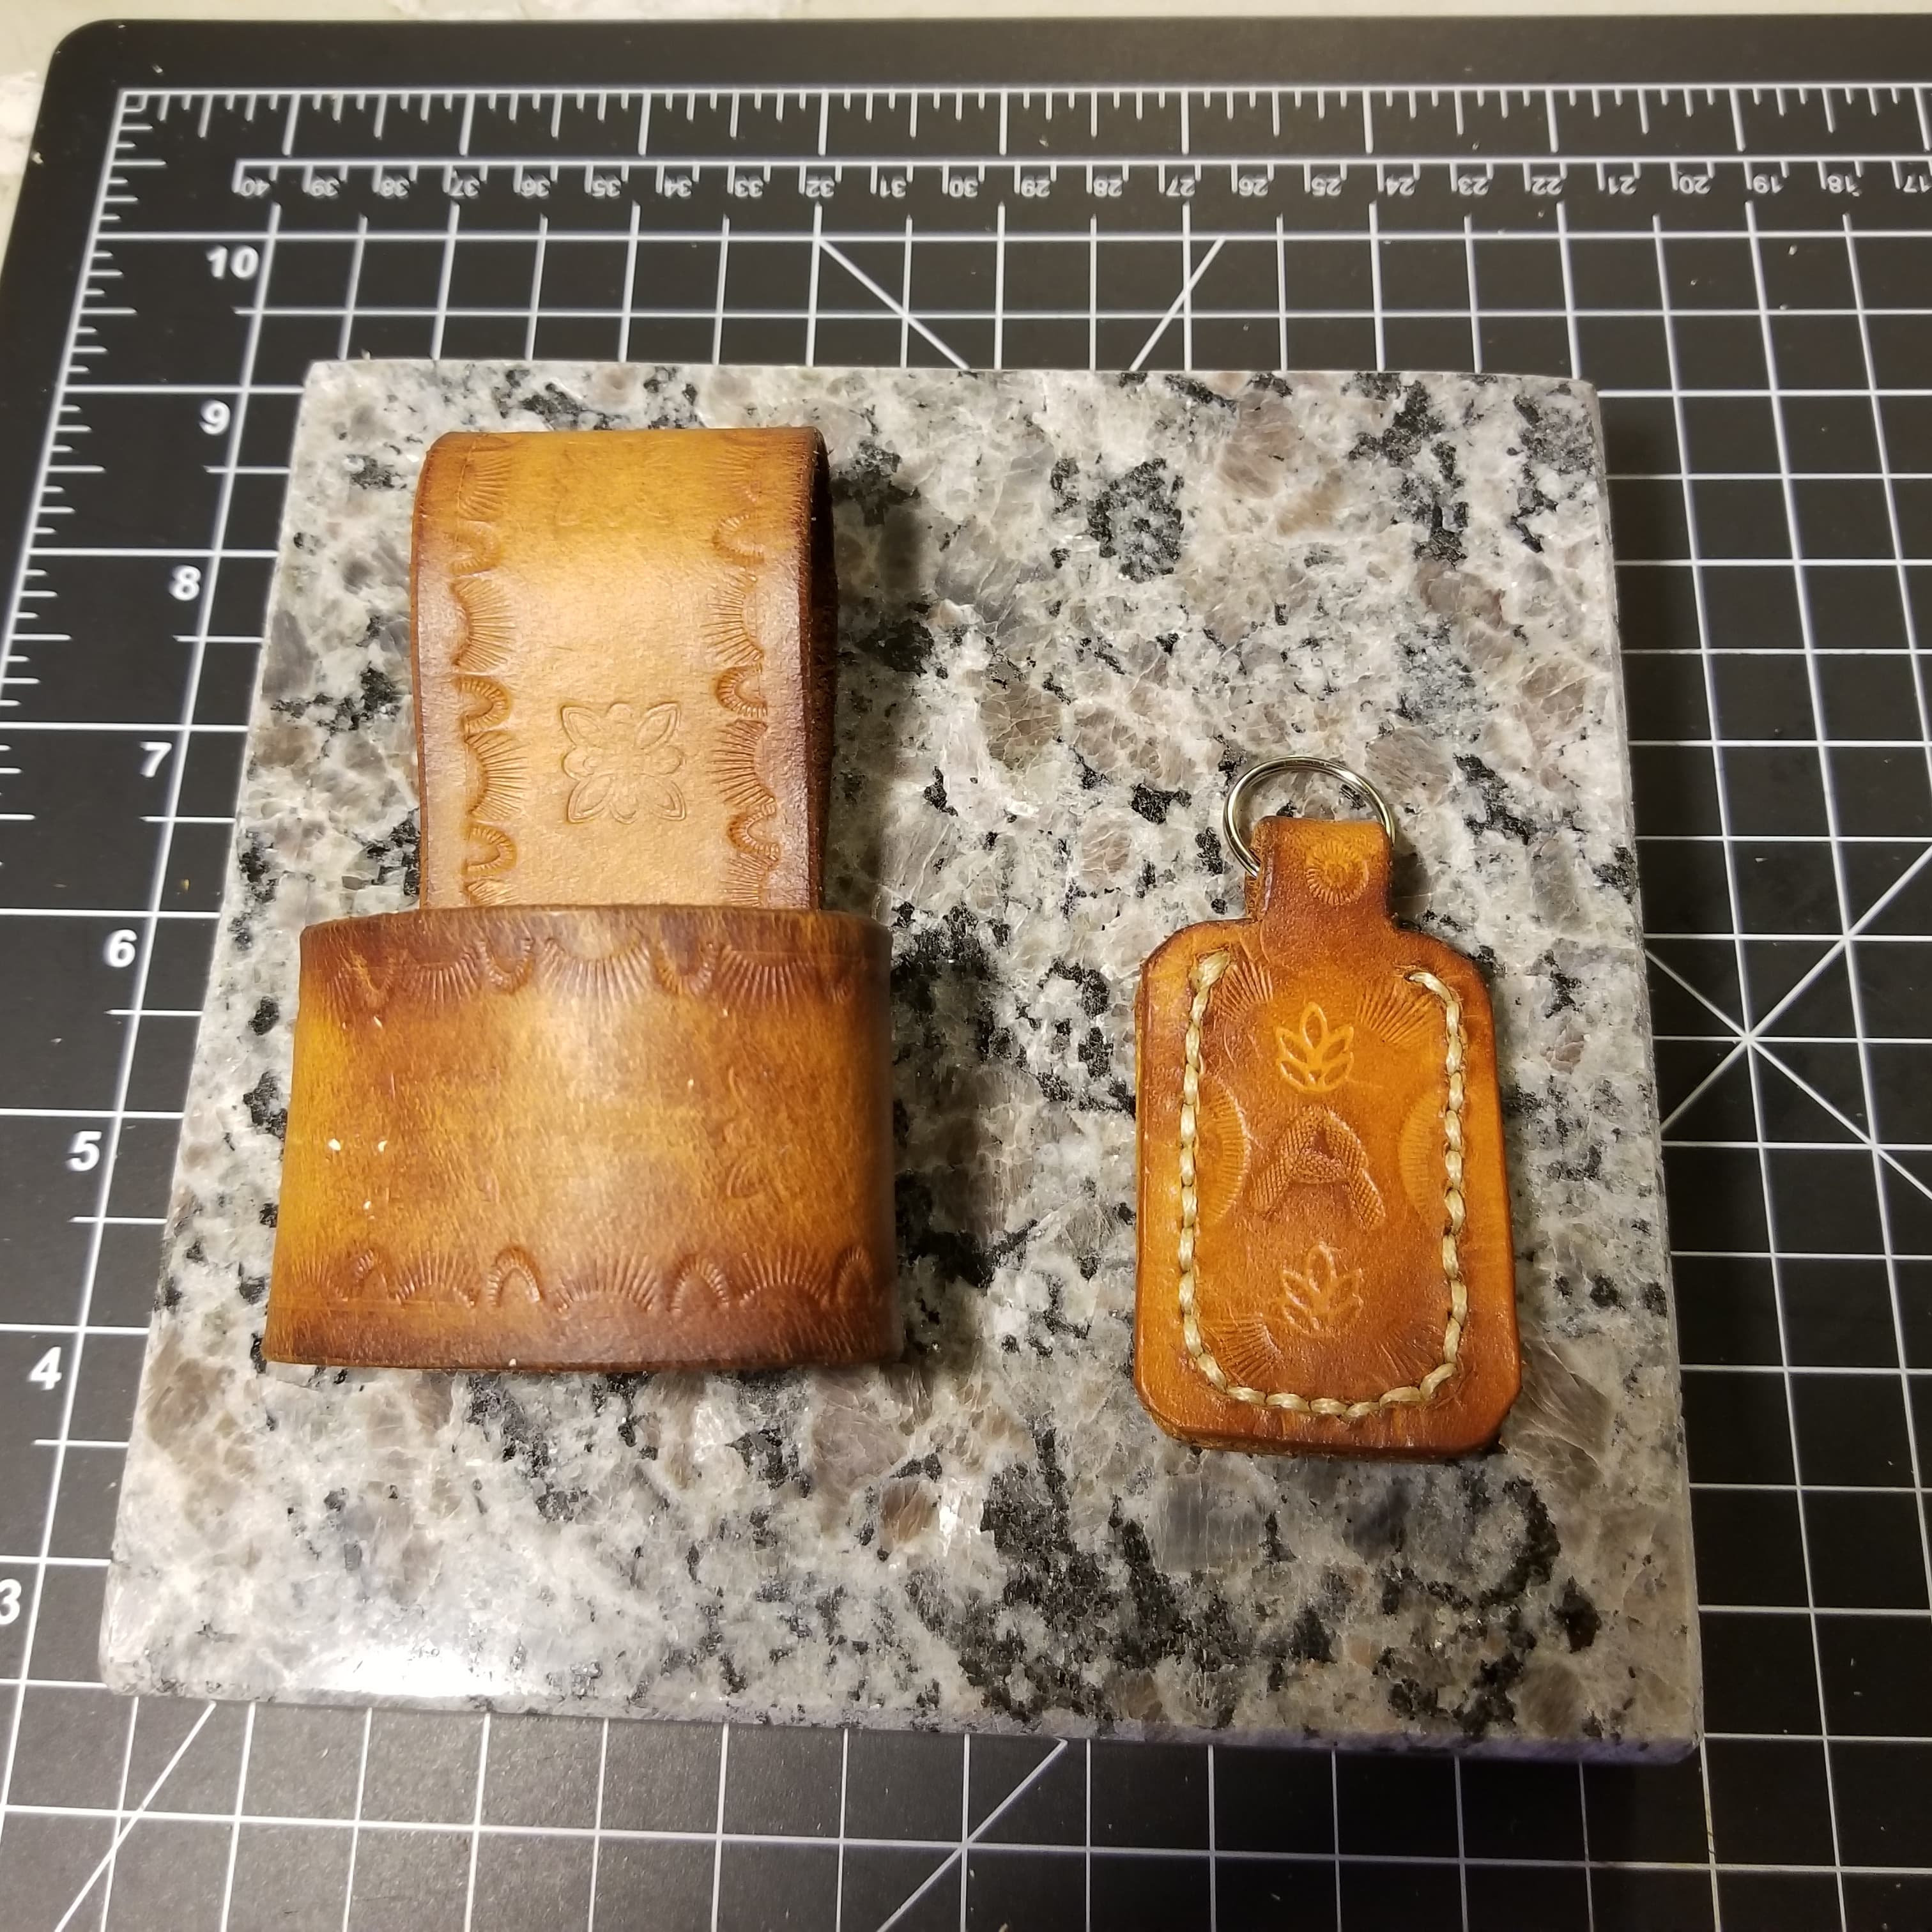
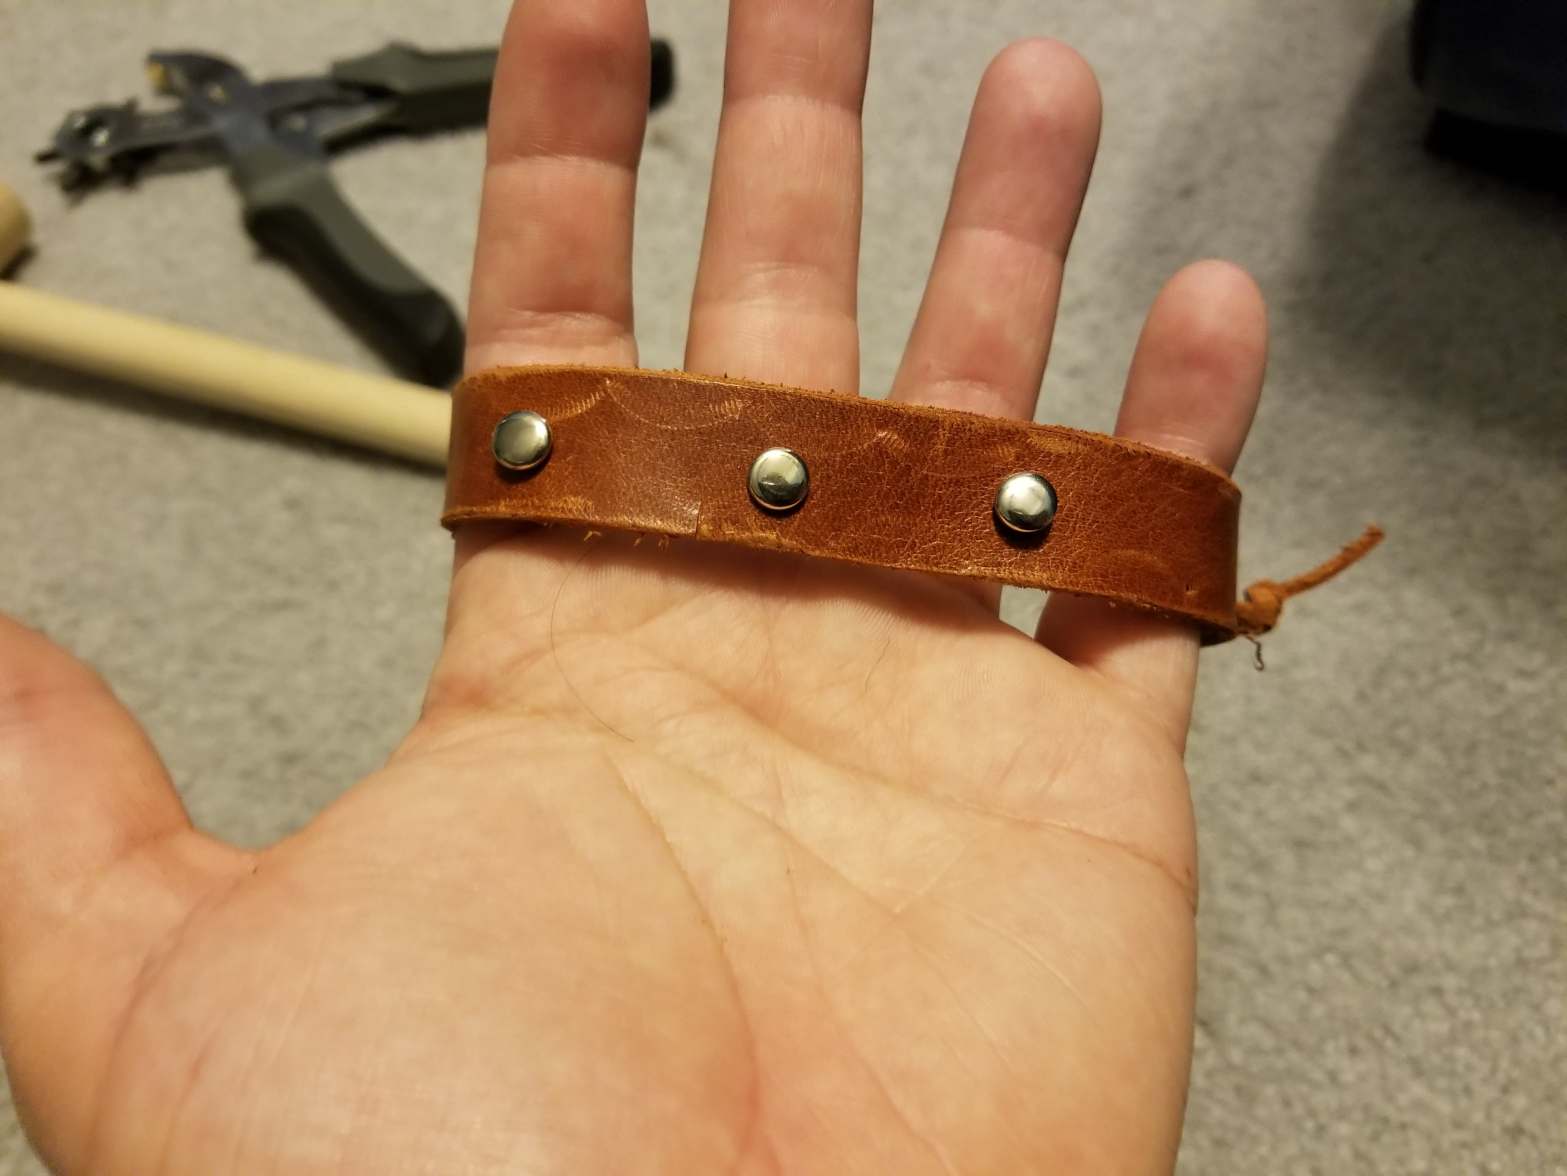
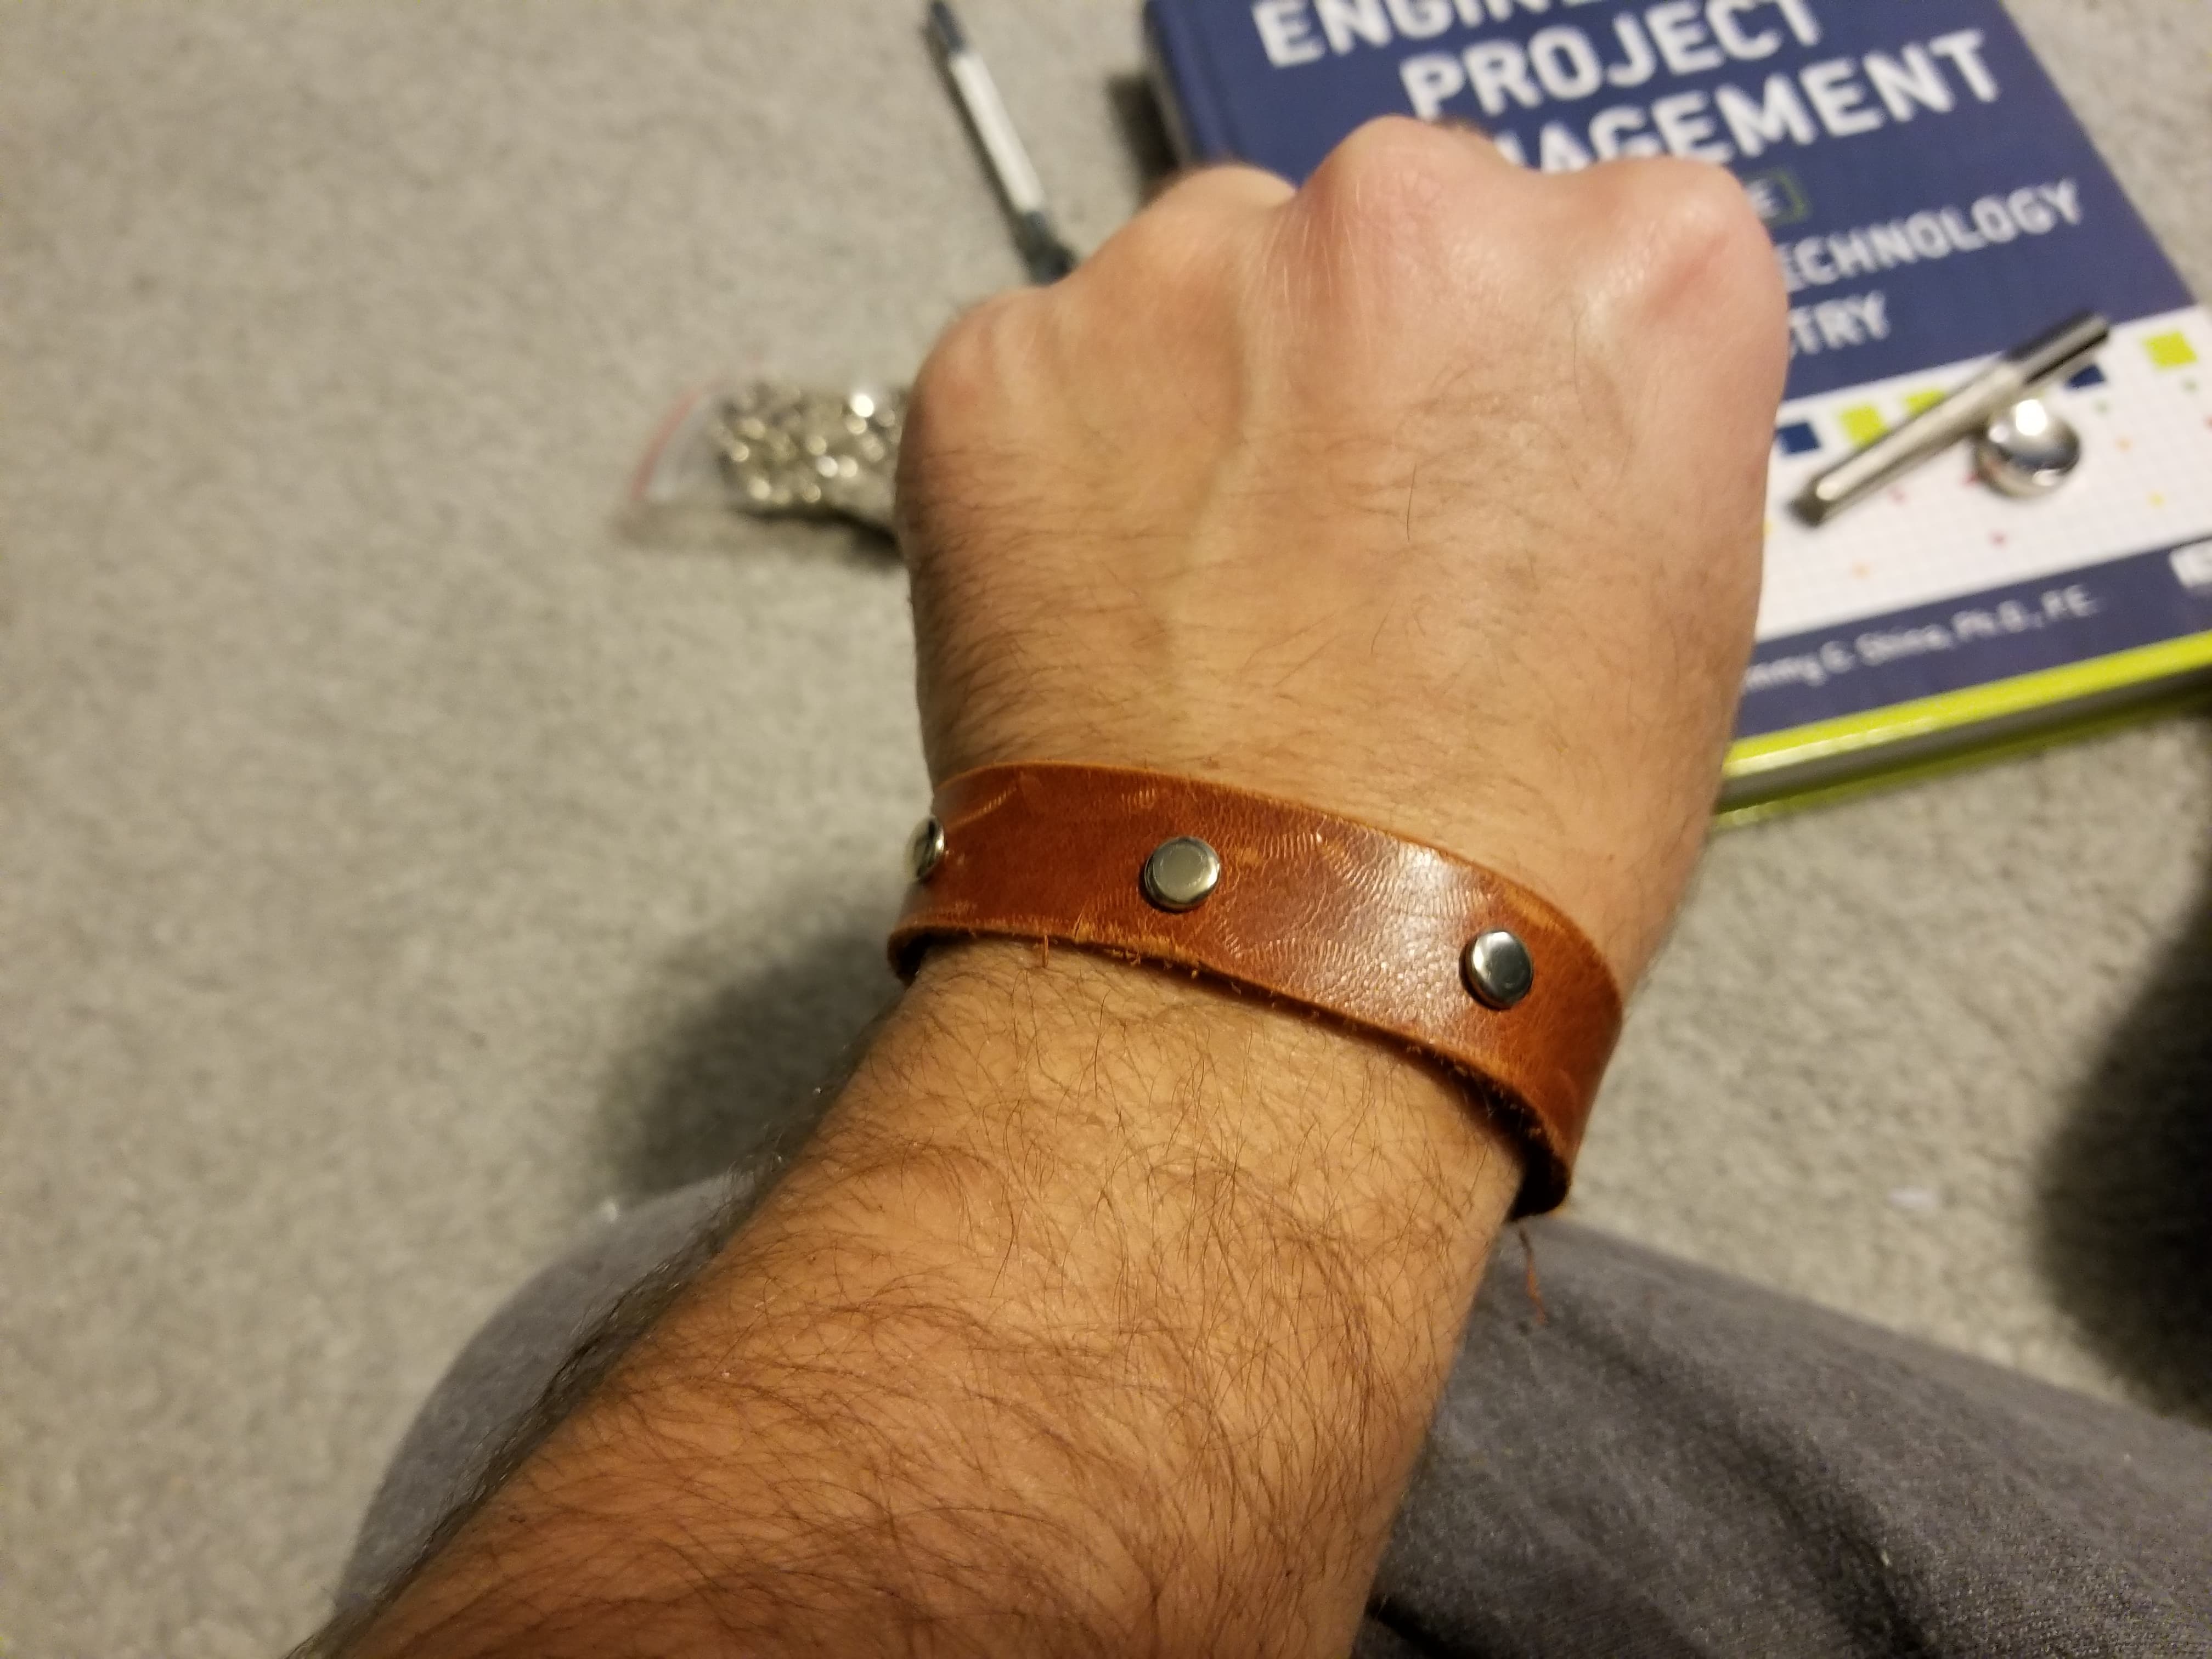
The first project was the small bracelet I made (see pictures below). The leather came from a scrap leather bag from the craft store Micheal’s. I added a quick stamp around the border that didn’t imprint really well, and 3 rivets. To tie off the bracelet to someone’s wrist, I just cut thin pieces of leather. It works well for a small bracelet, but I tried that same thin leather rope method for other projects and they didn’t work out well.

First project: Bracelet with some rivets
First project: back side of bracelet, used thin pieces of leather as a string/rope

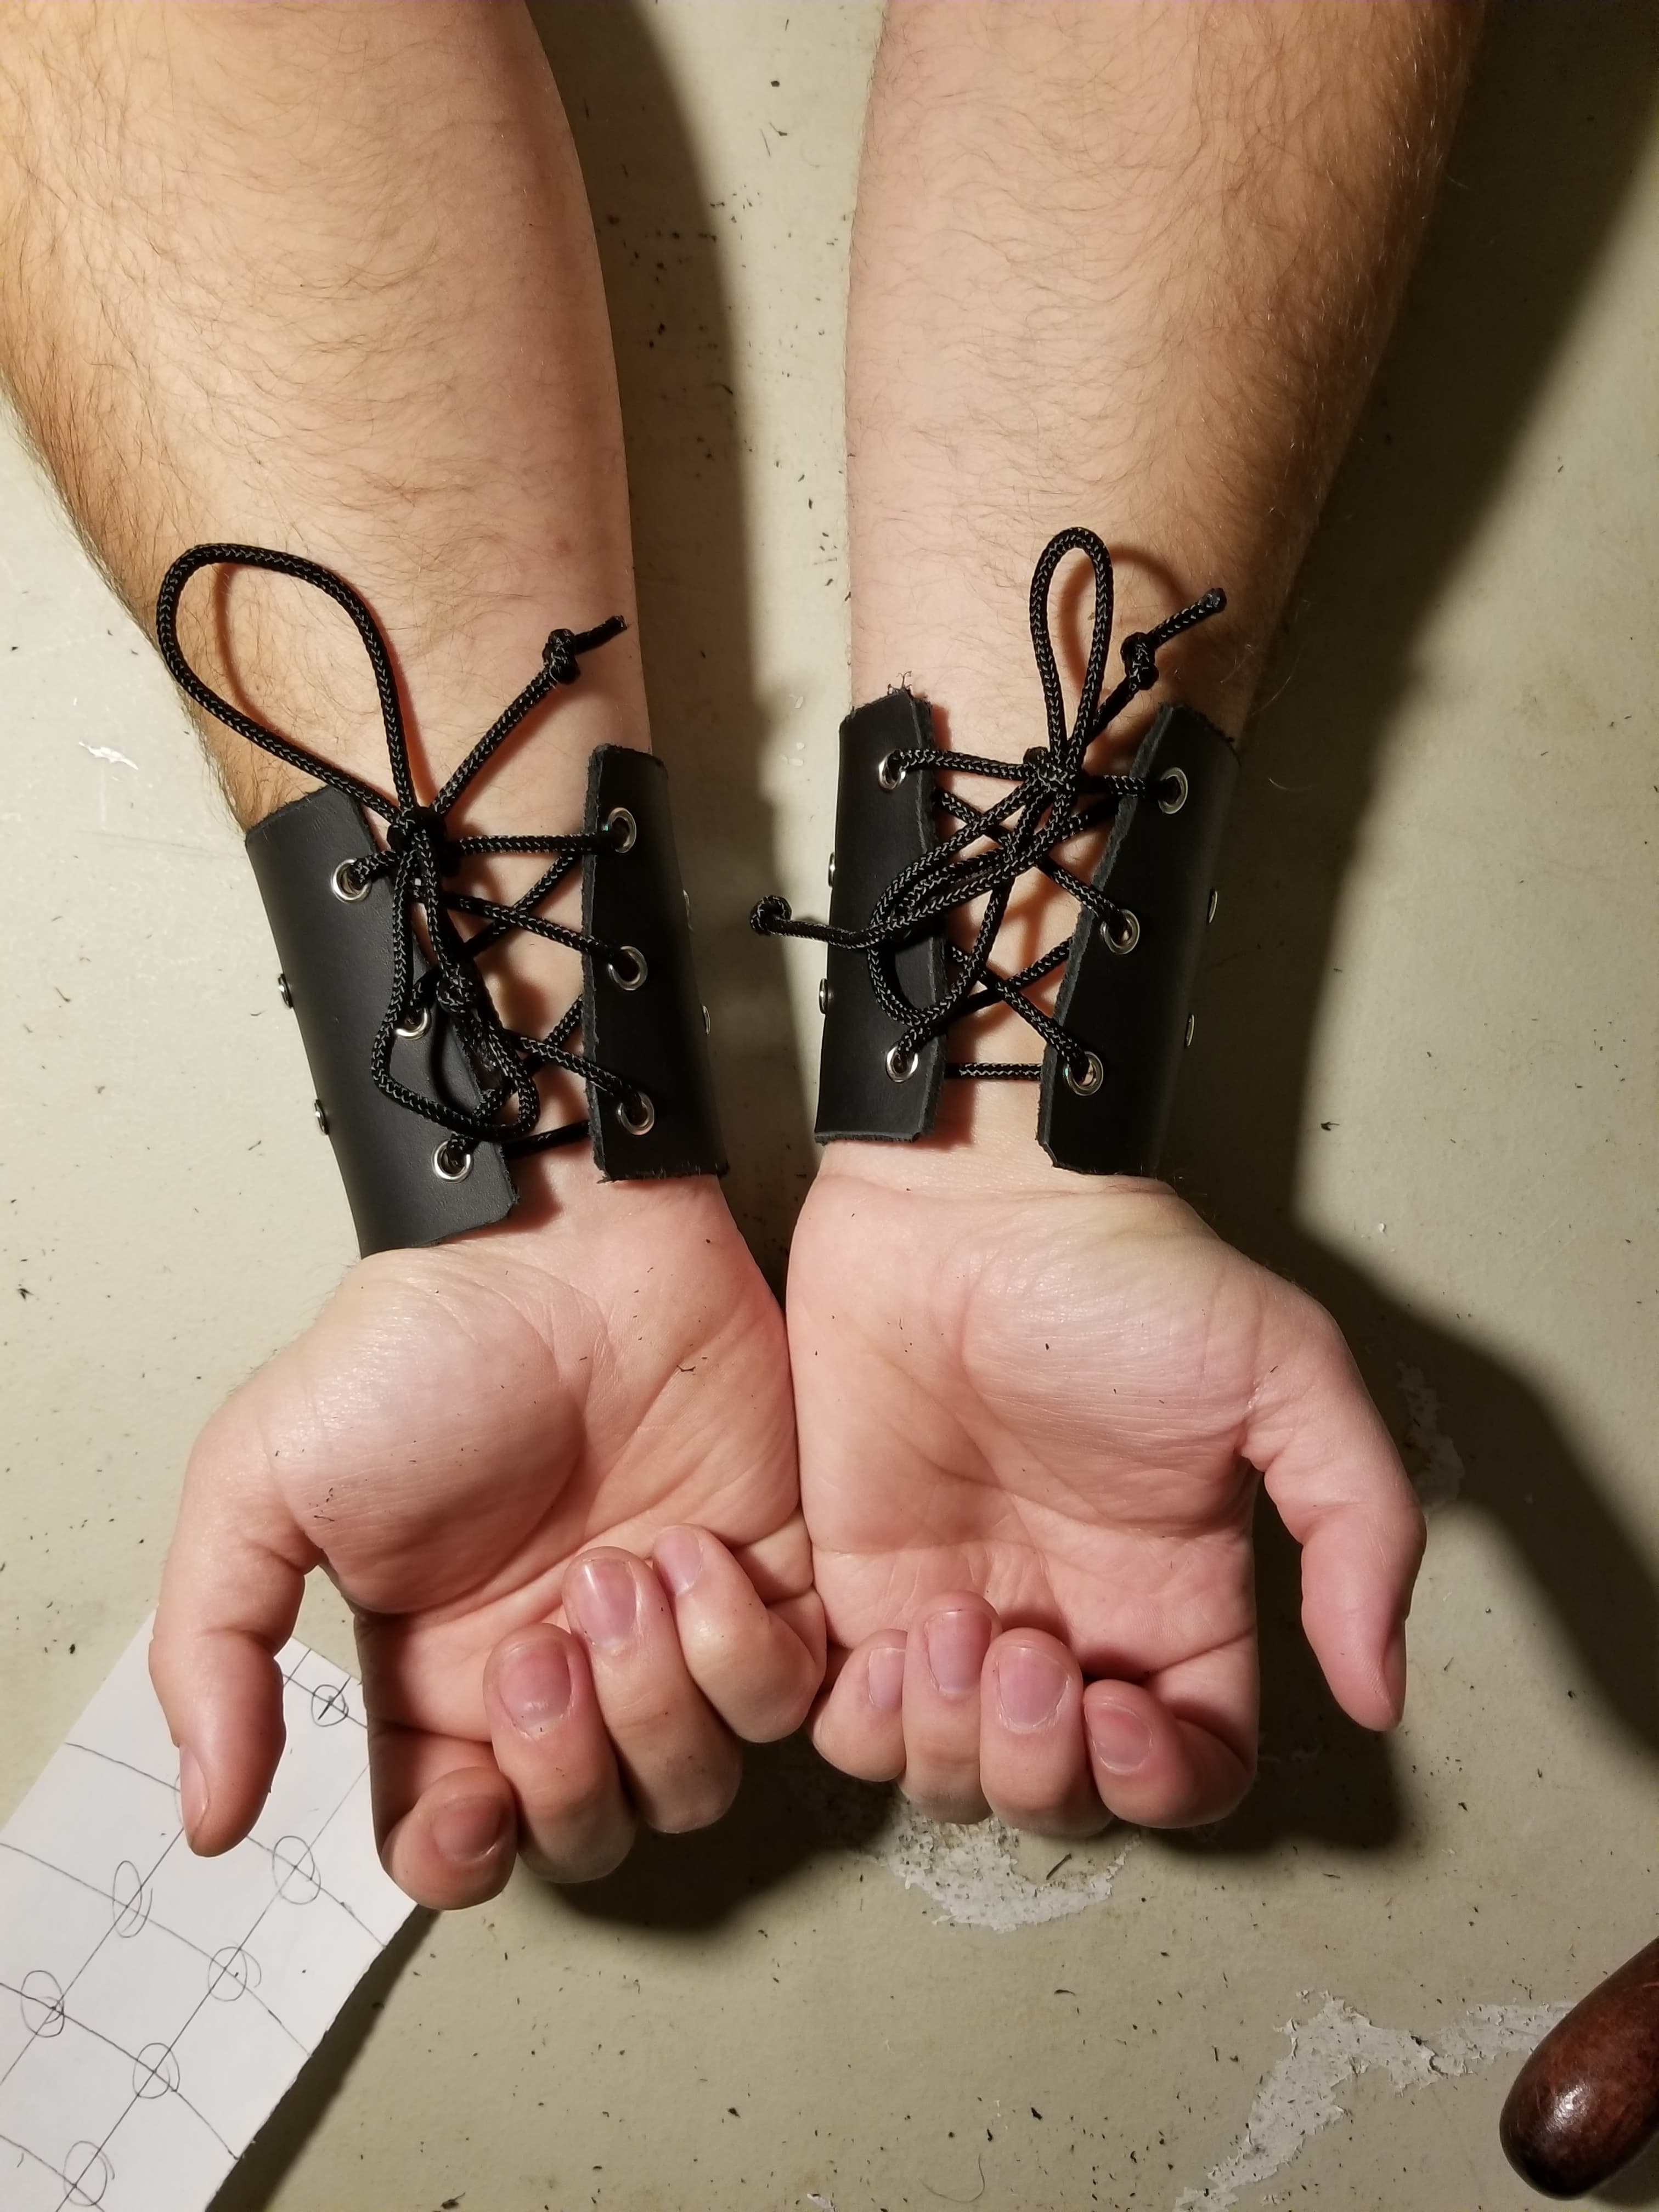
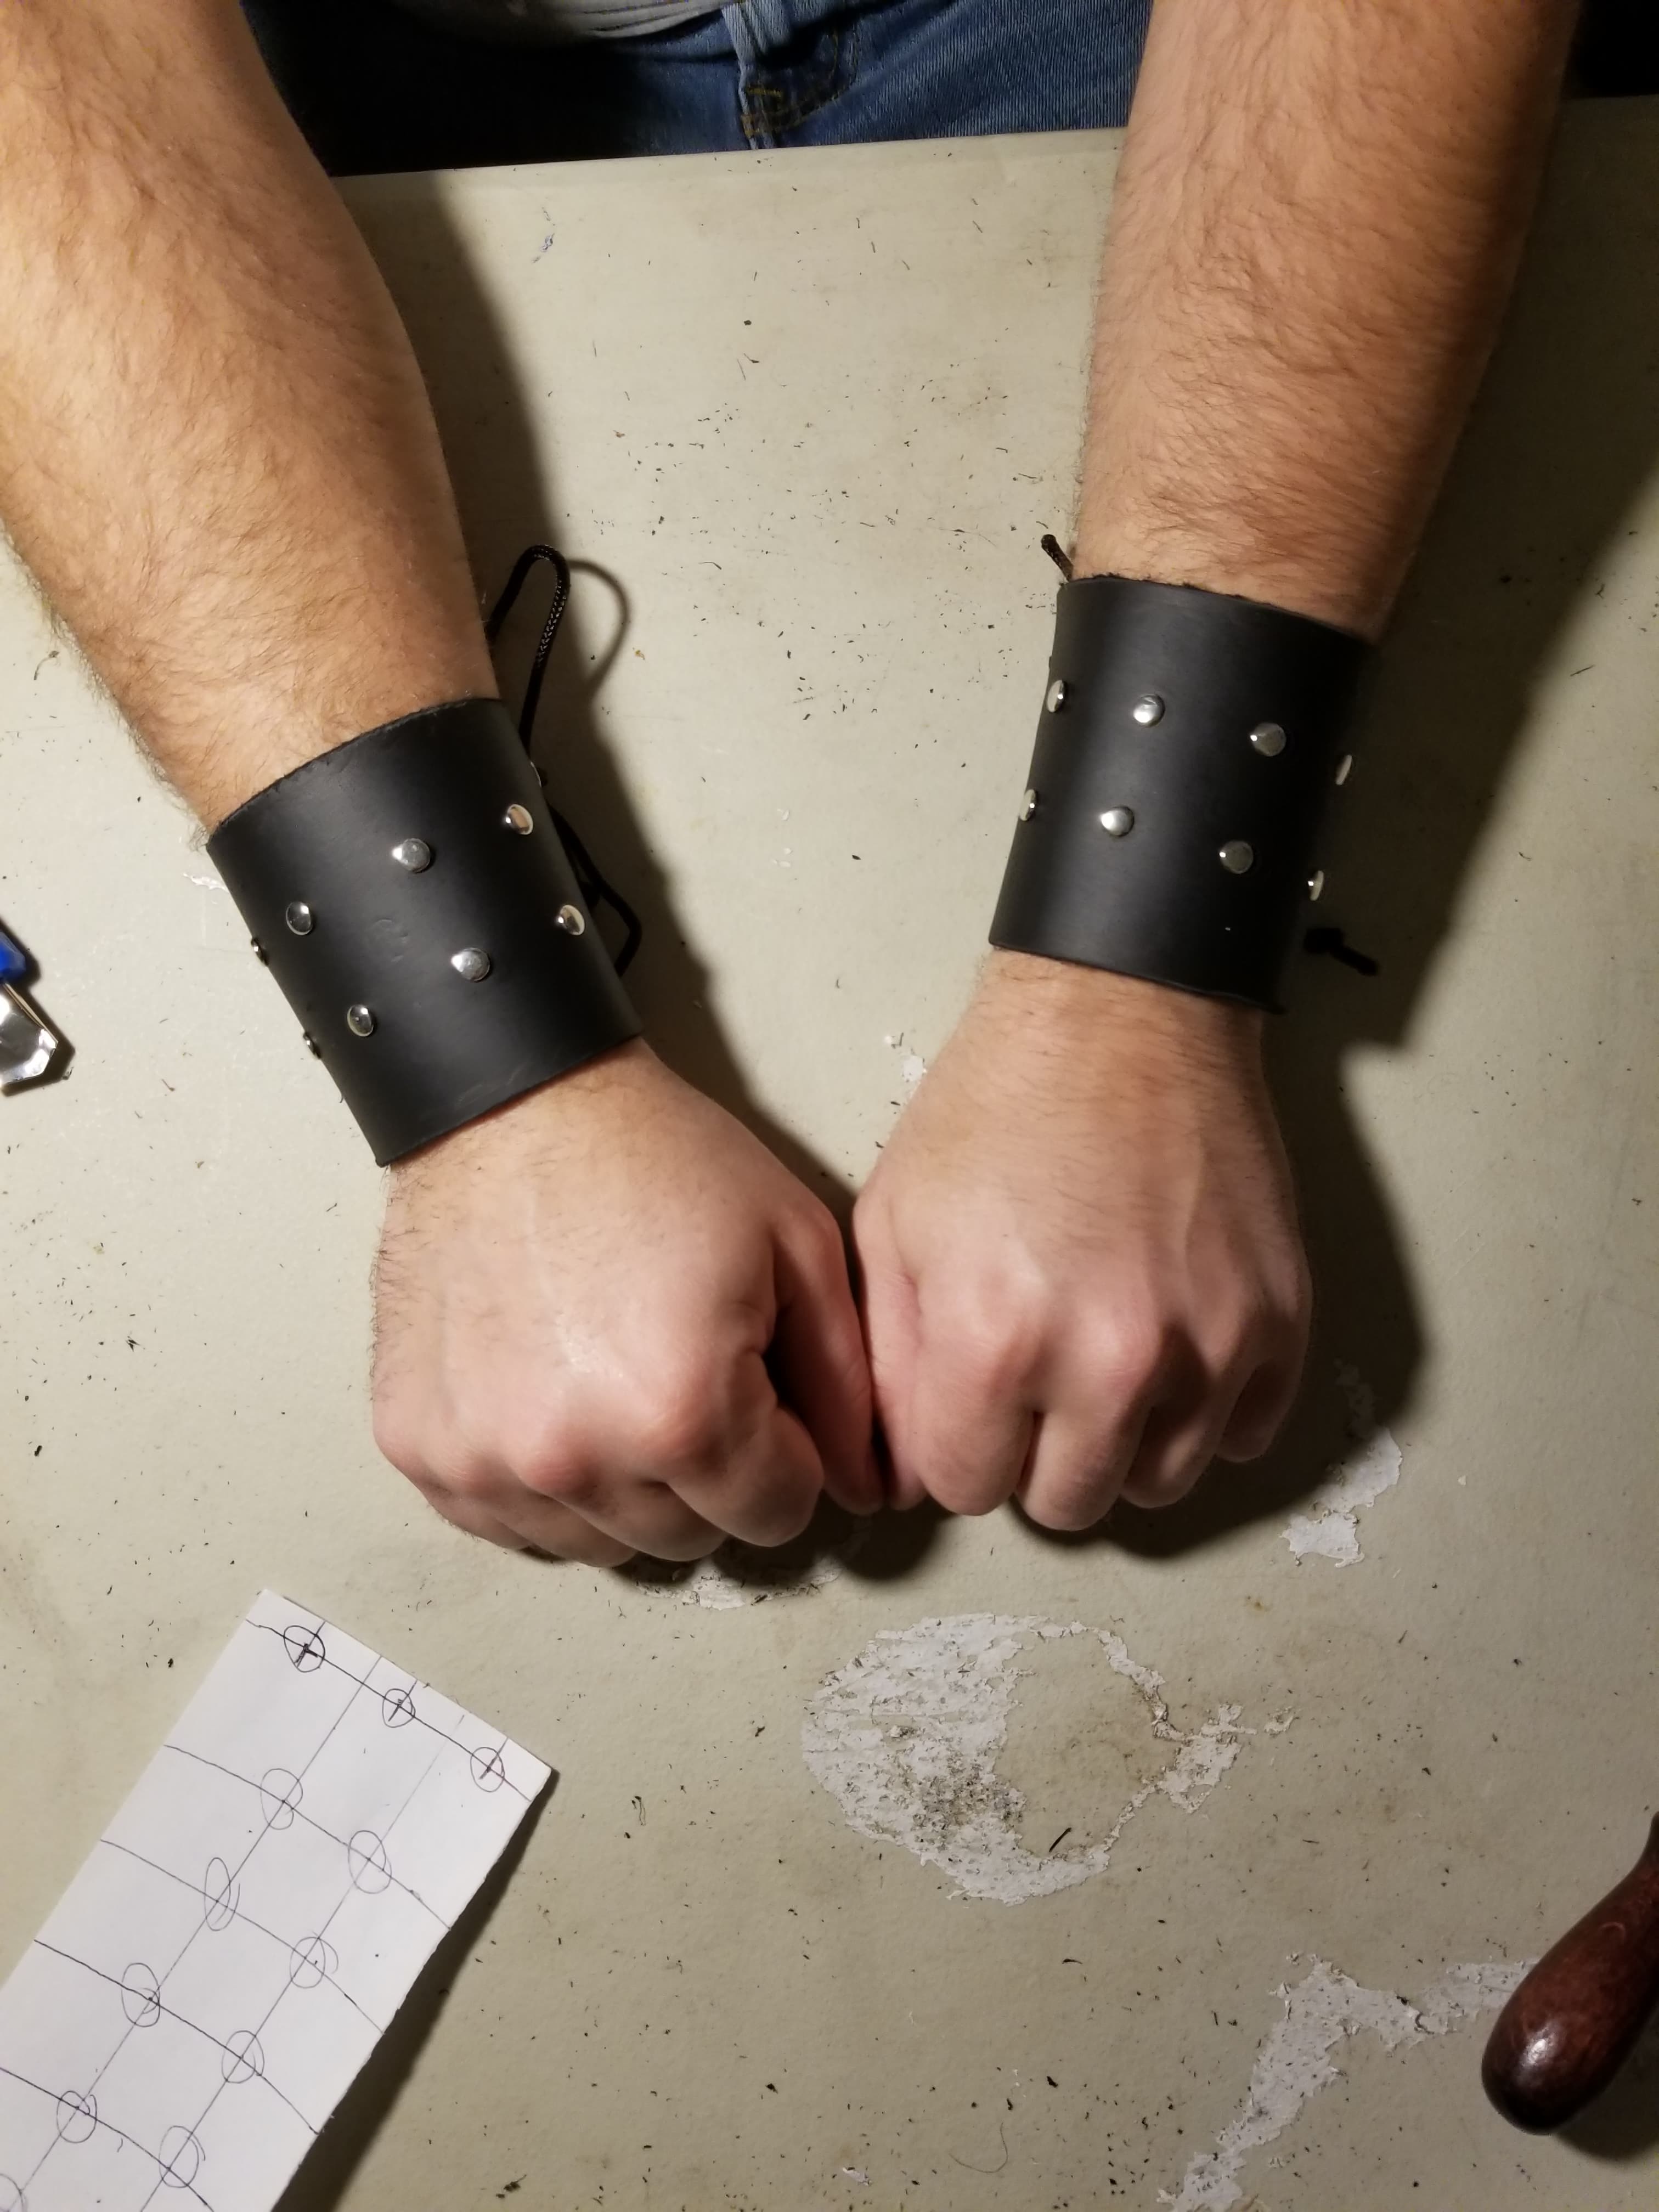
The second project I completed were a pair of black cuffs. I essentially like my bracelet and wanted to take that to the next step. I actually drew up a pattern on paper for this one. Once again, I used some scrap leather from a bag from the craft store Michael’s. I attempted to add some stamps around the border and in the middle, but they are very hard to see, they don’t even show up in photos! Like before, I tried used thin leather as rope, and it did not work well at all. It wouldn’t tighten around my wrists like I wanted. So I went out and bought some eyelets and paracord as the rope for tightening. In my opinion it works perfectly, exactly how I wanted it to.

Second project: cuffs with rivets
Second project: back side of cuffs, with para-cord and eyelets

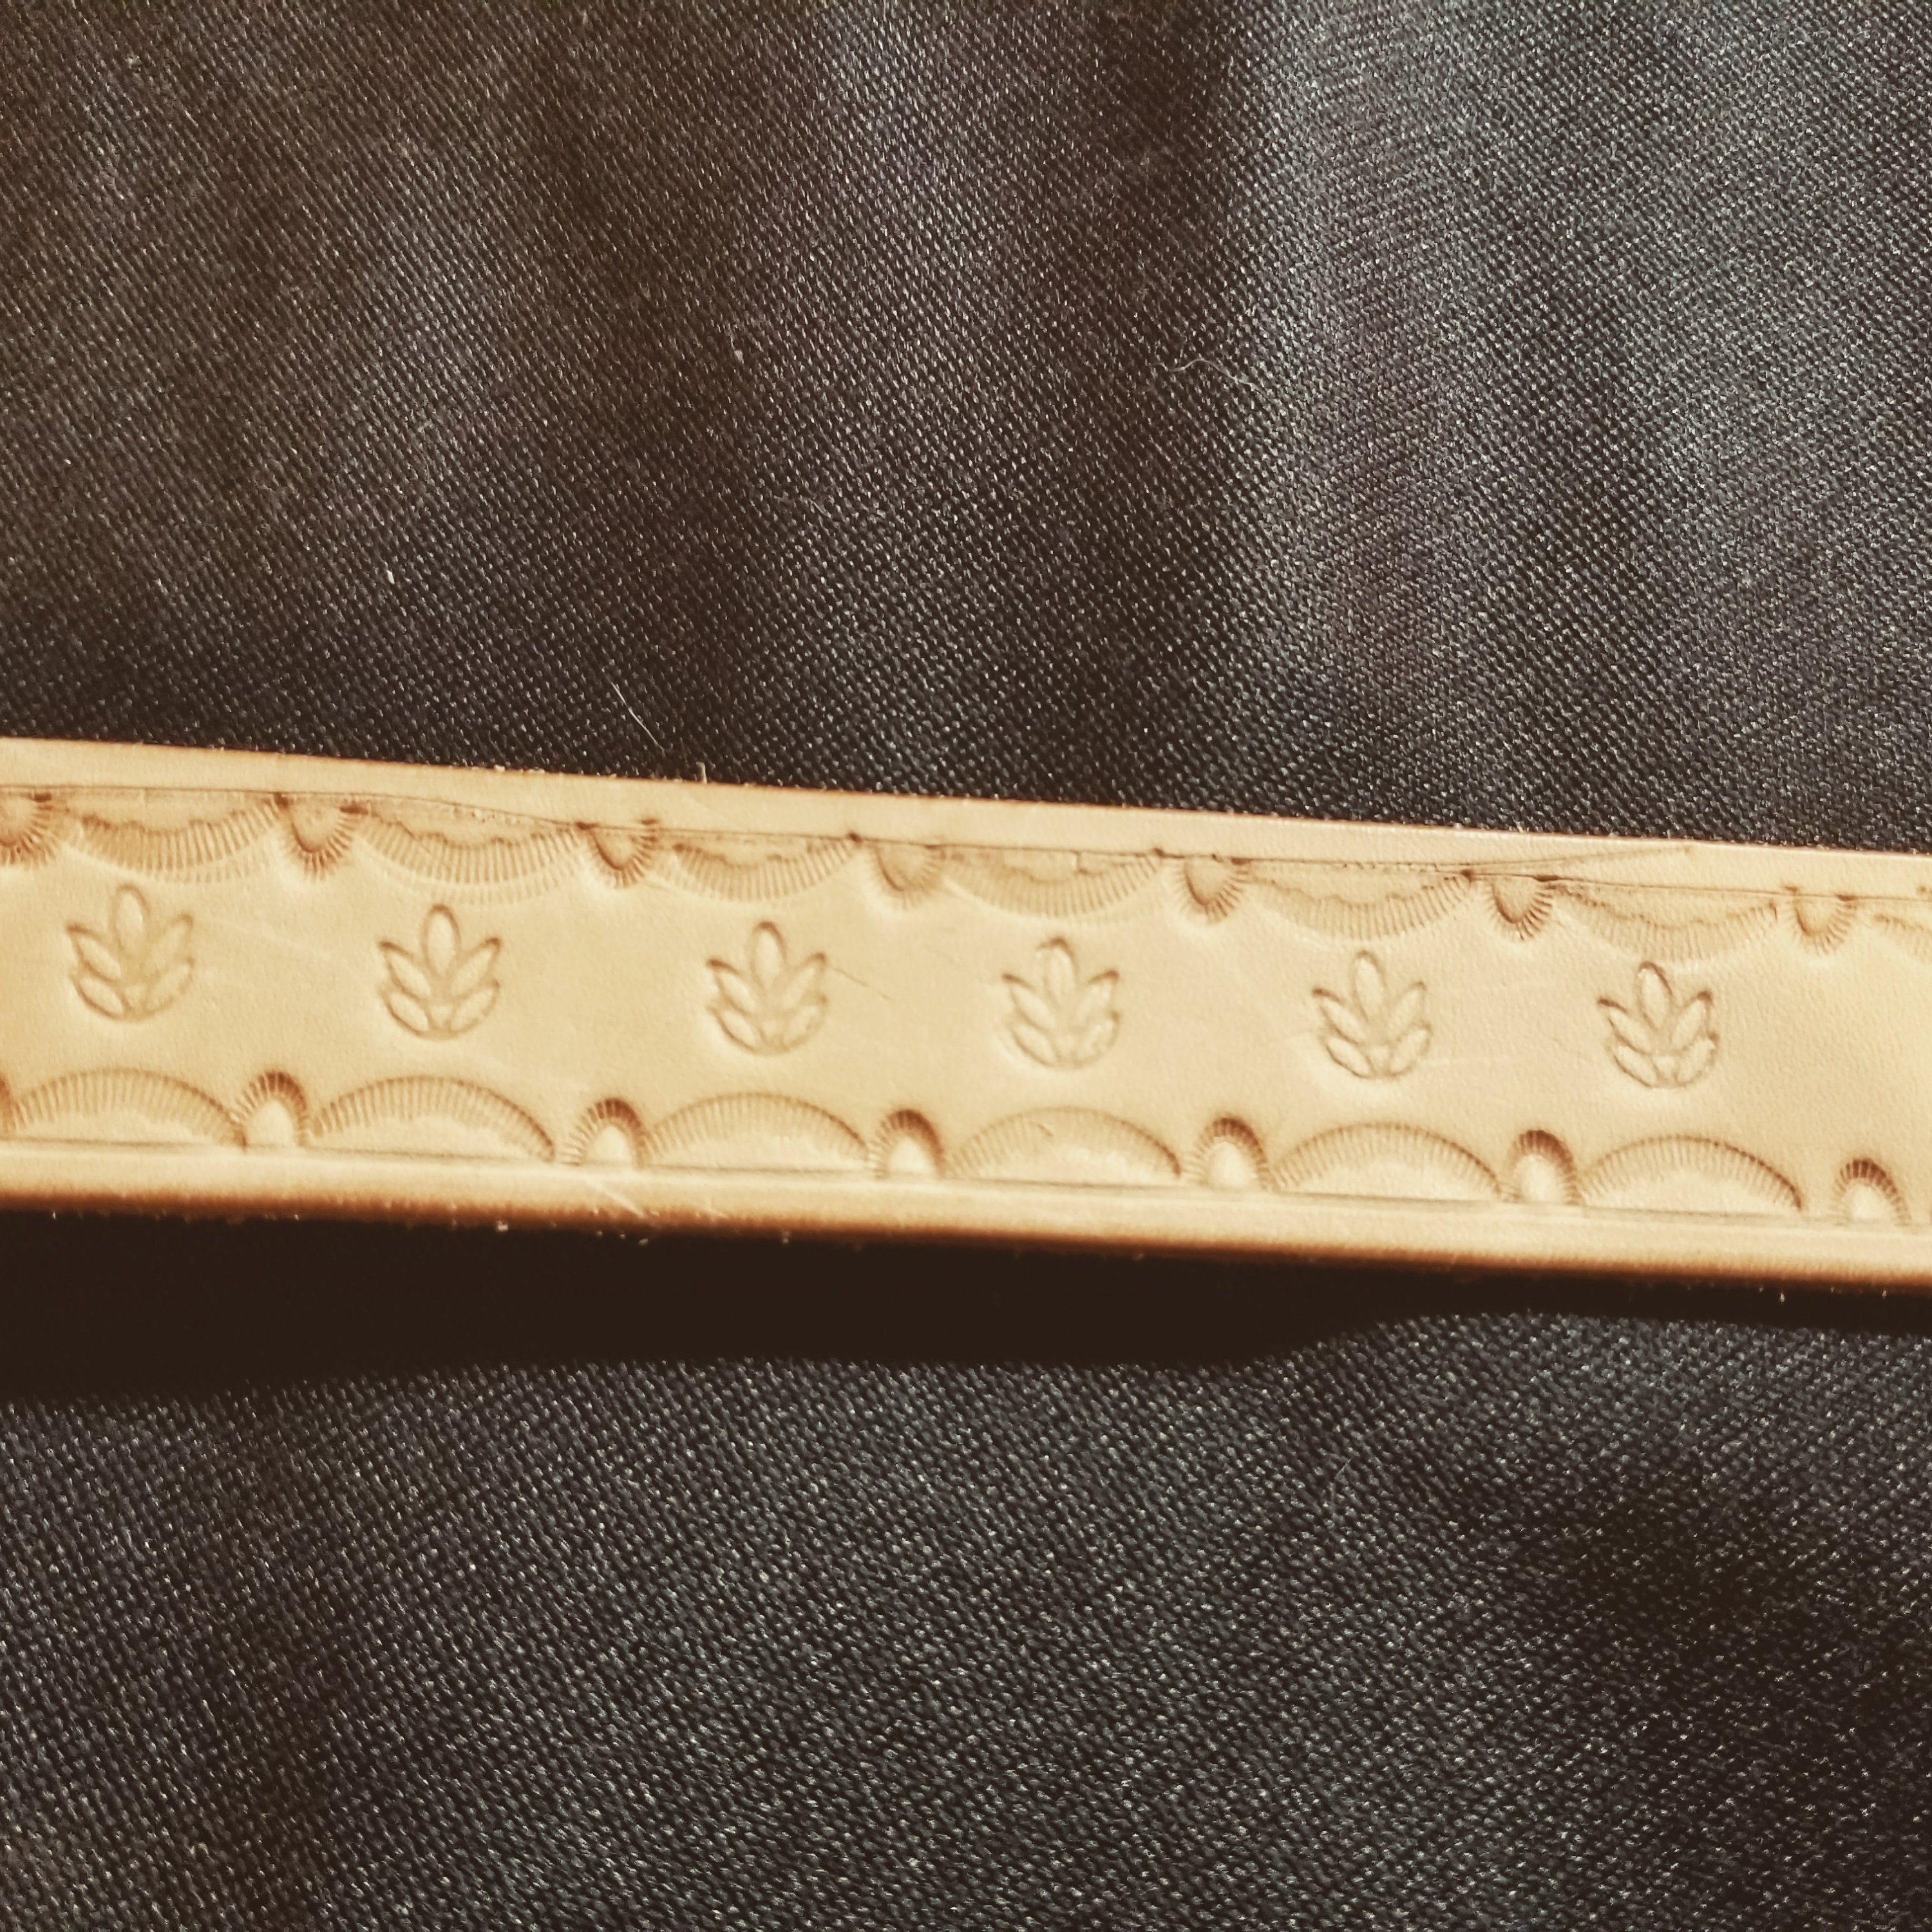
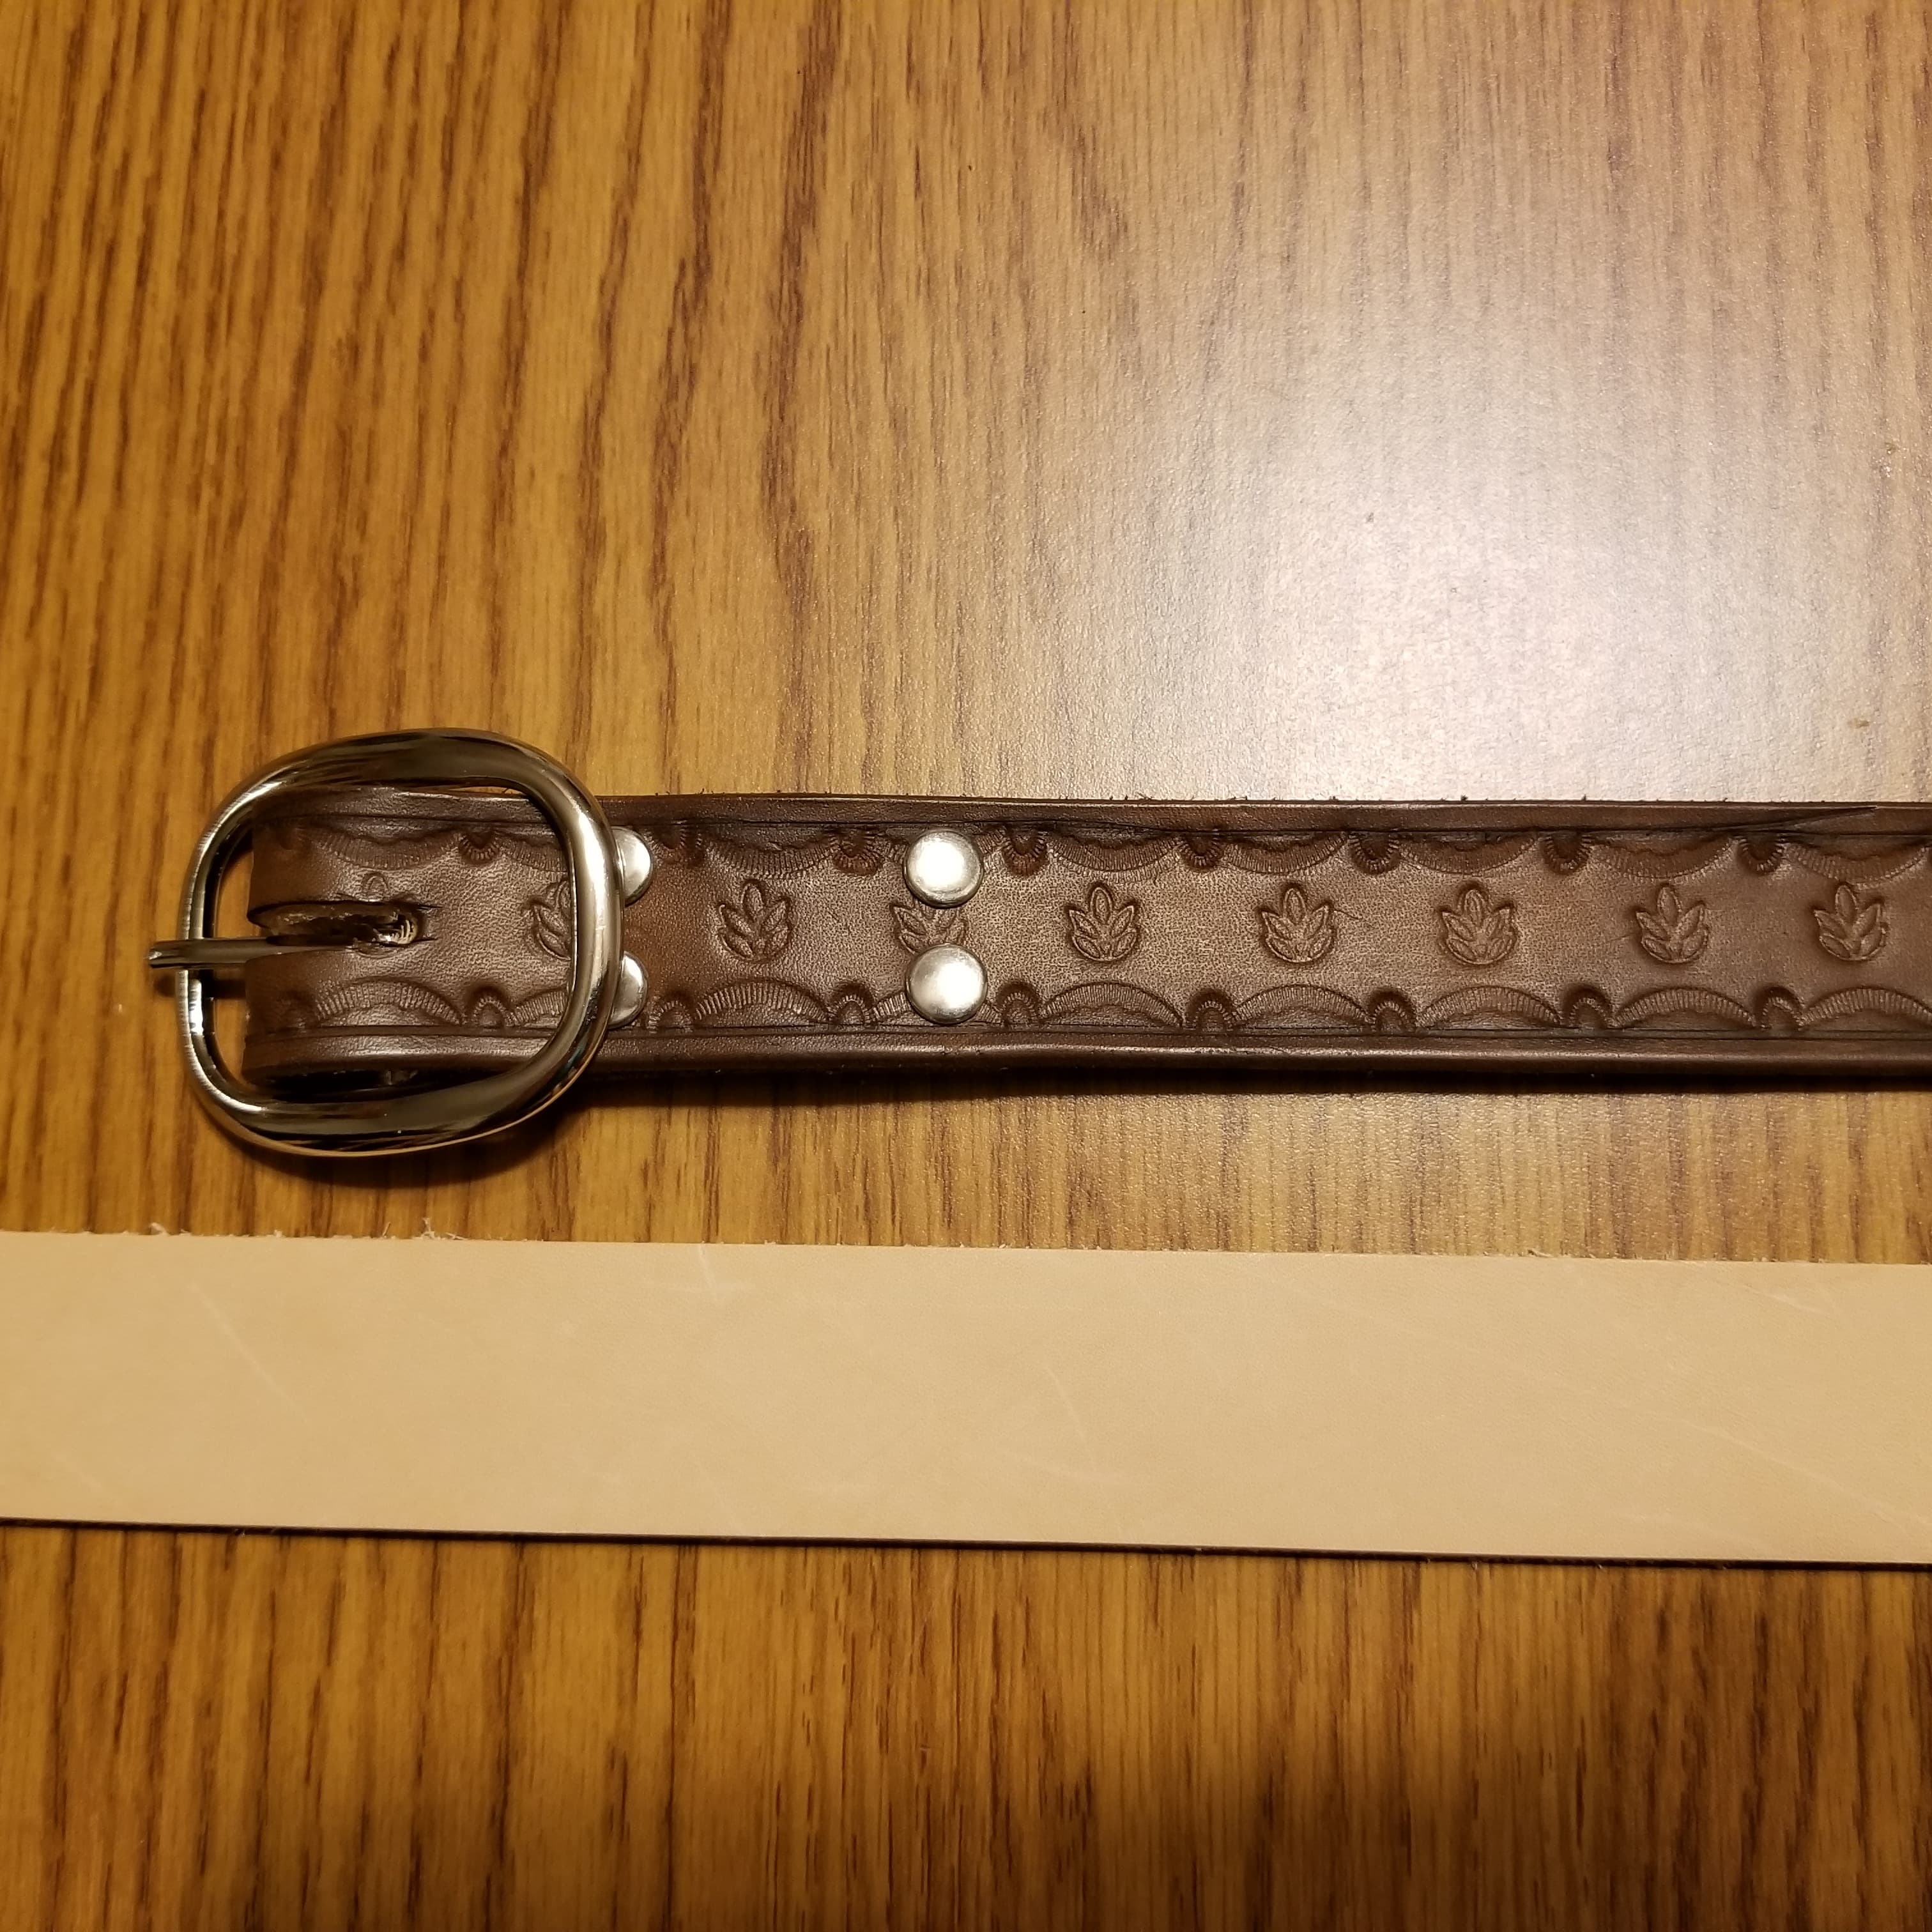
My third project, which is also kind of my first is the belt I made. I’ve been working on it since before the bracelet but it took me much longer to finish. First thing I did was cut off the end to match the length of a belt I already owned and used quite regularly. I then wet the leather and stamped the entire border around it over a couple days. After that was done, I needed to cut out an oblong piece for the buckle to fit into, and then dye it. I only died the front, but I should’ve dyed the backside too. I then bought some leather sheen finish to protect it. And this, it was done!

Before/after belt project

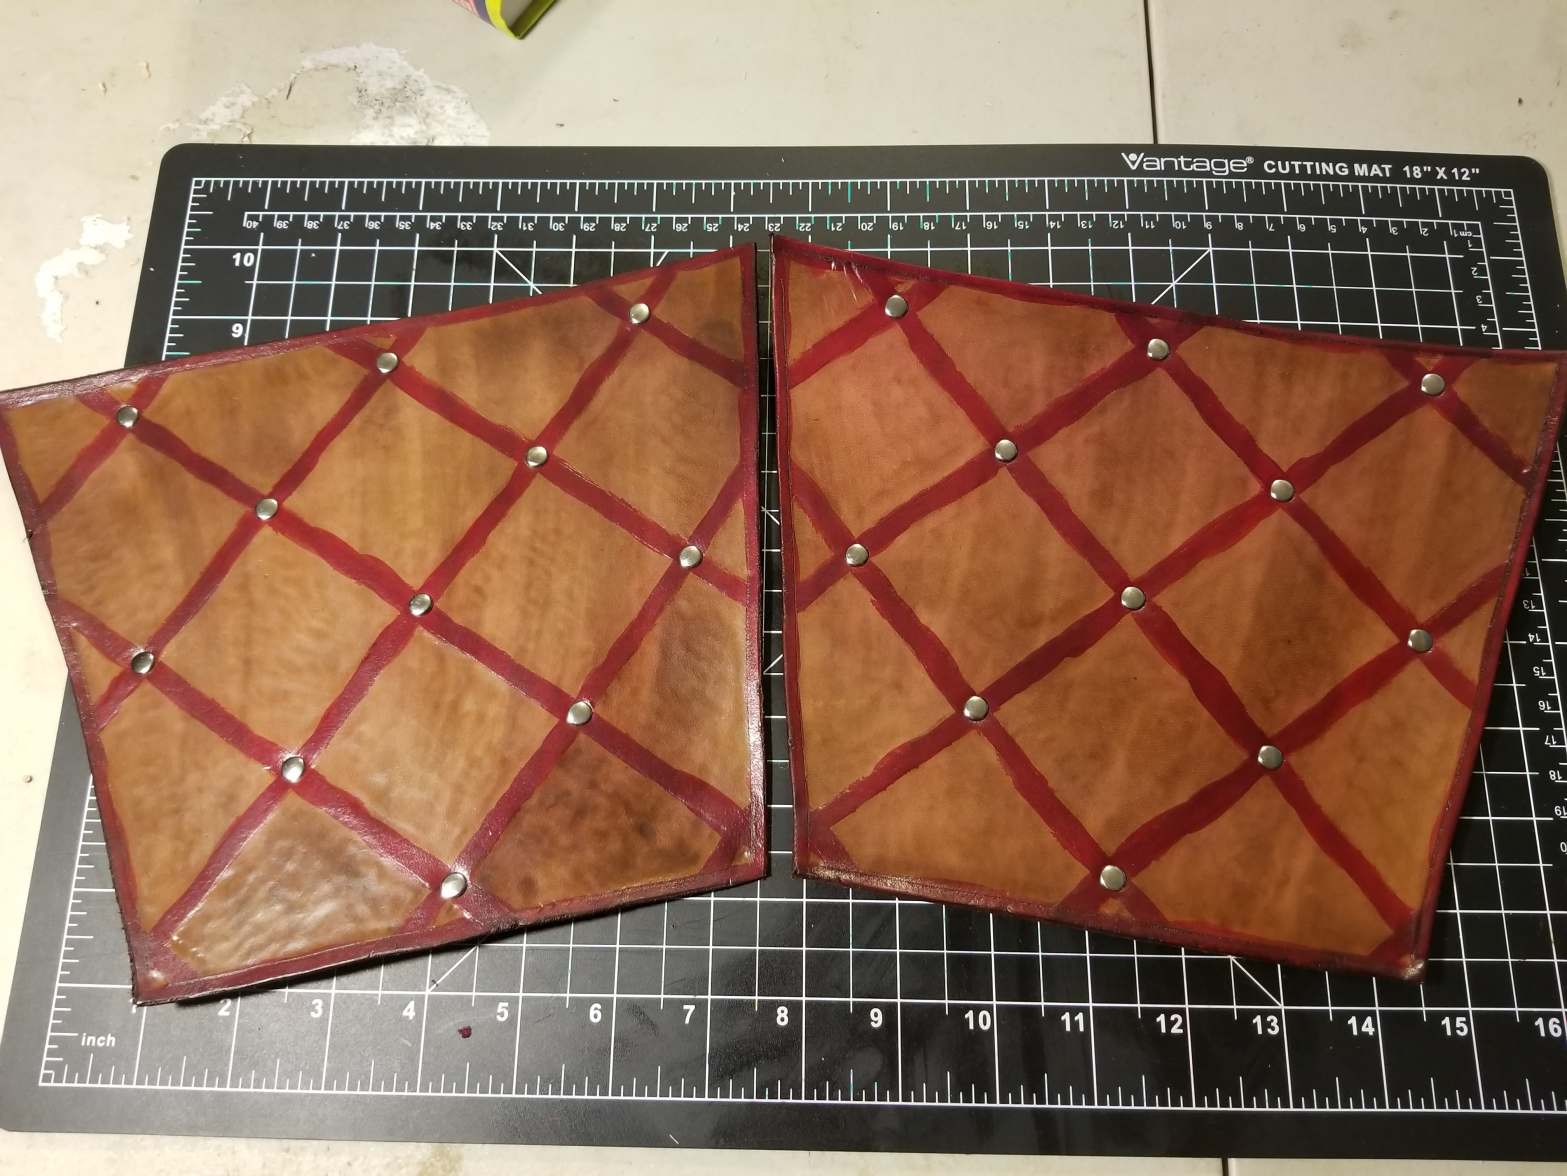
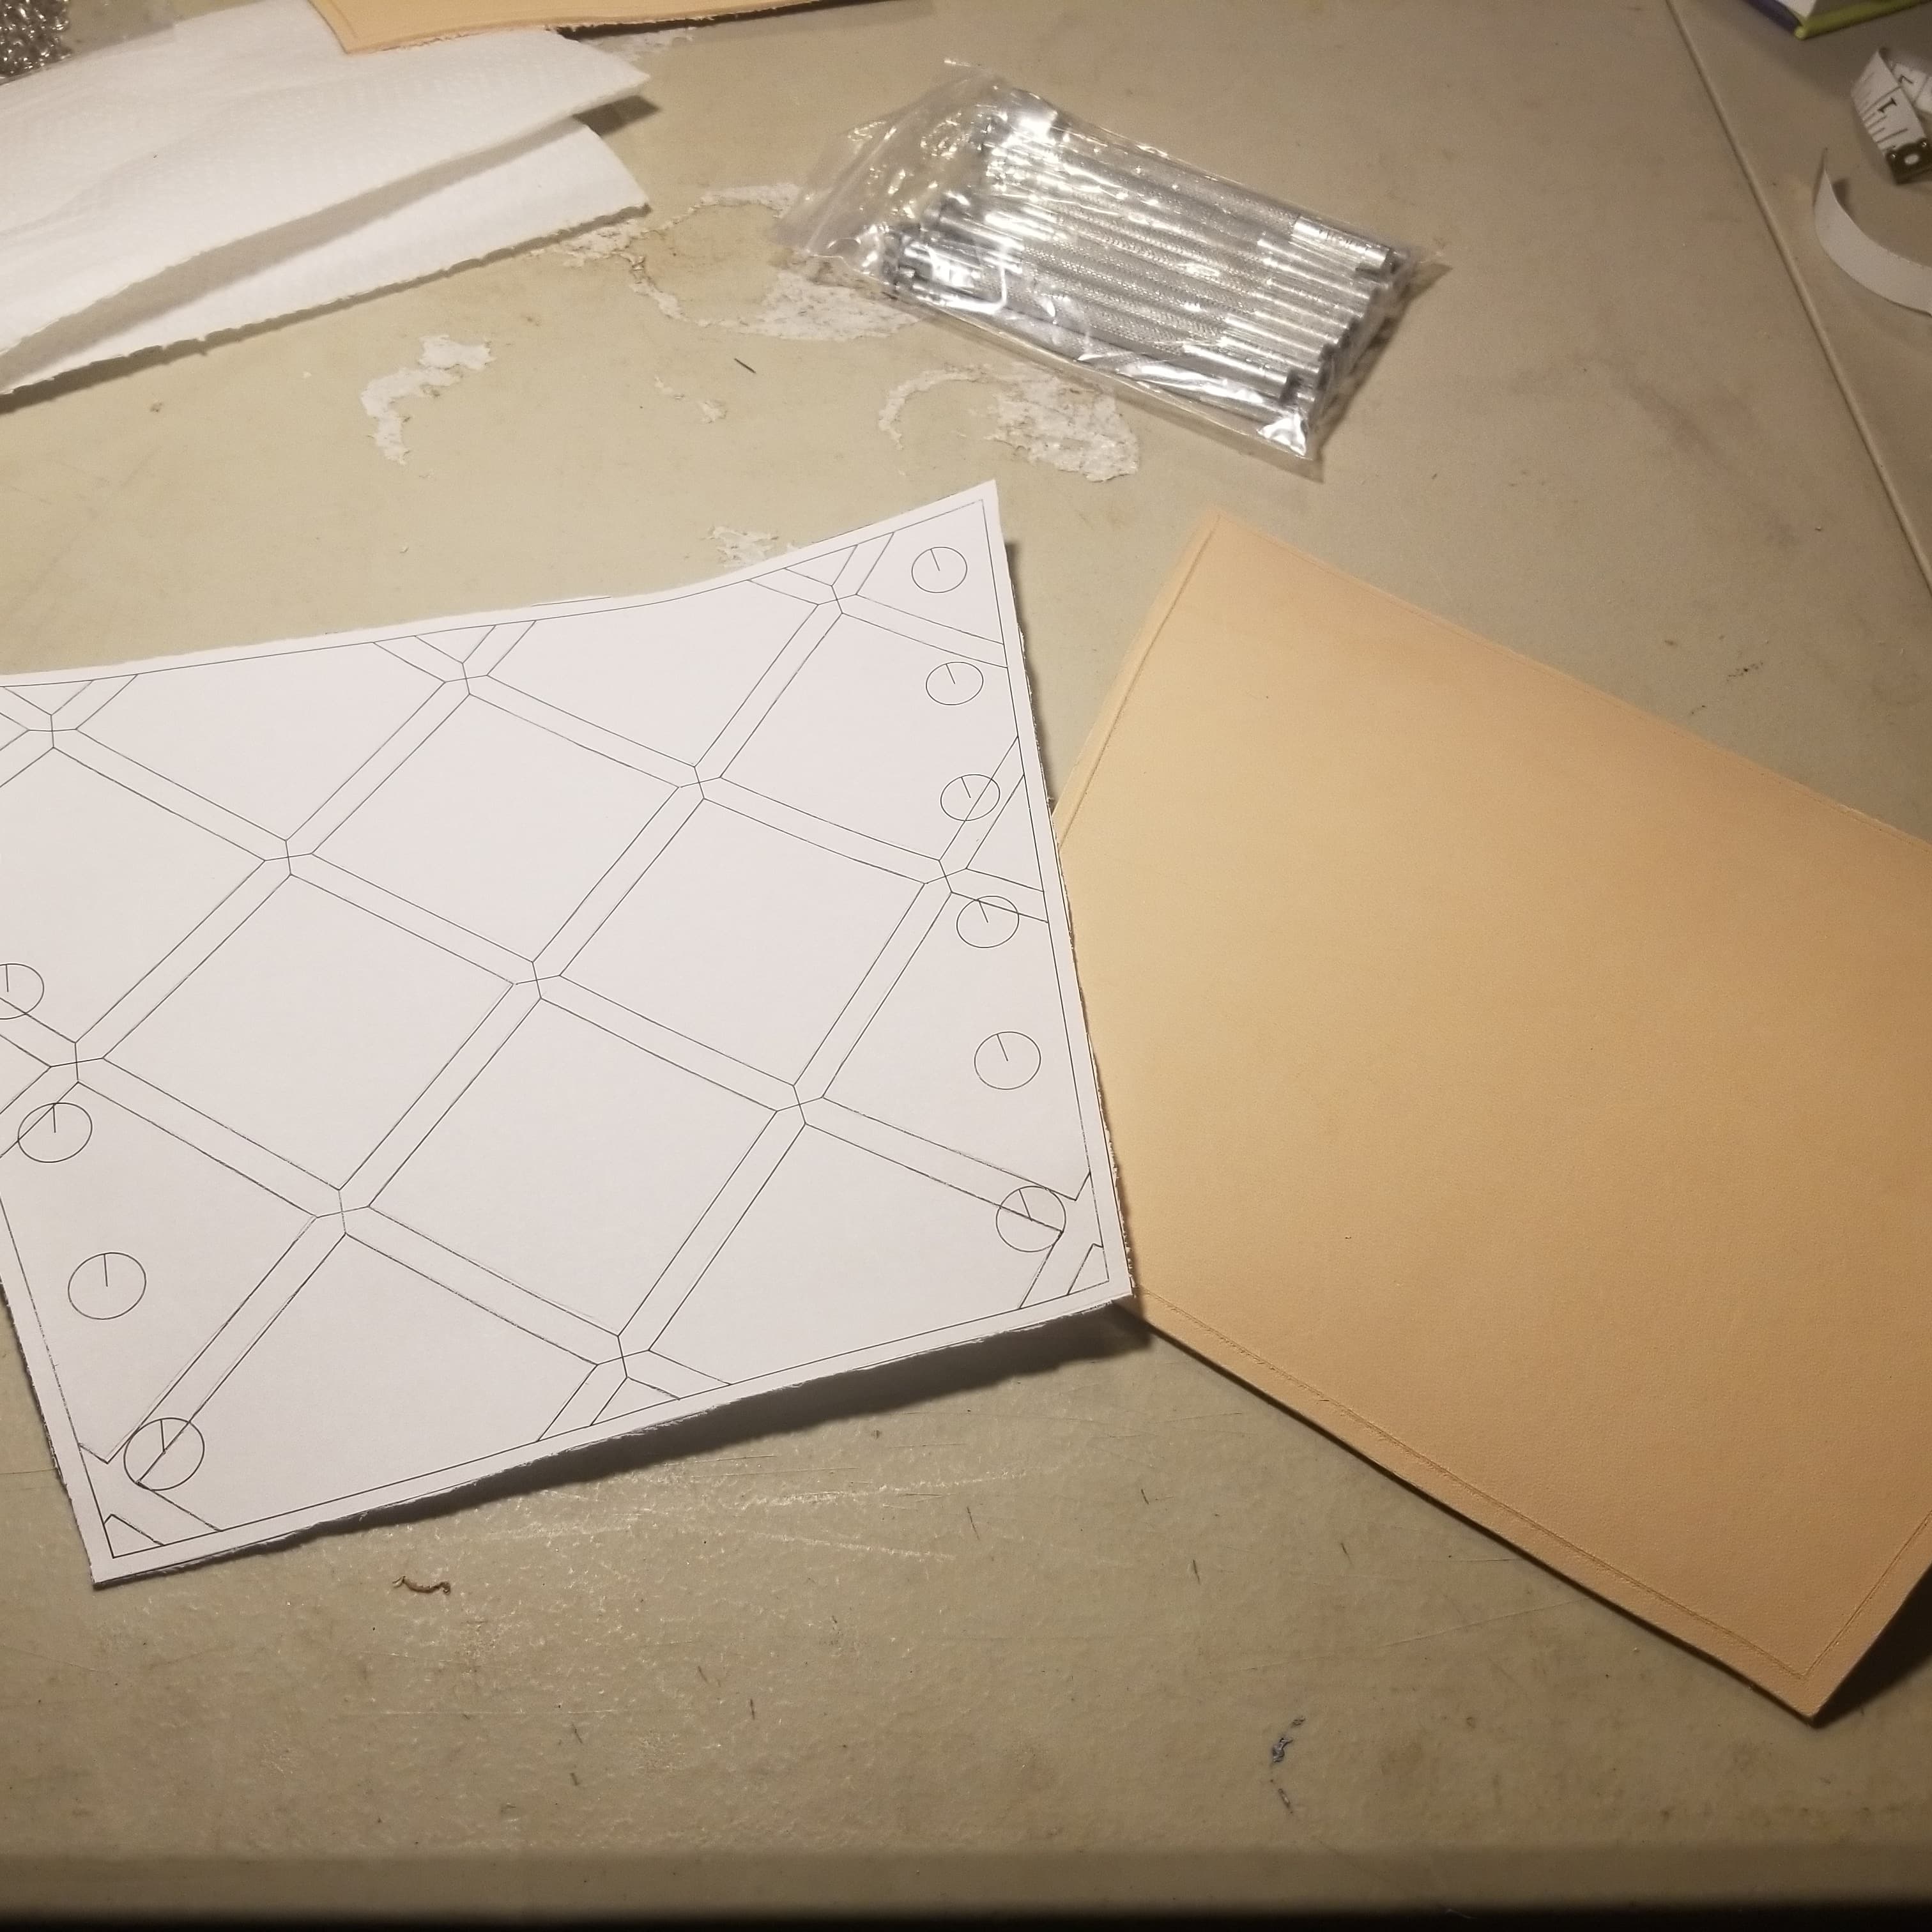
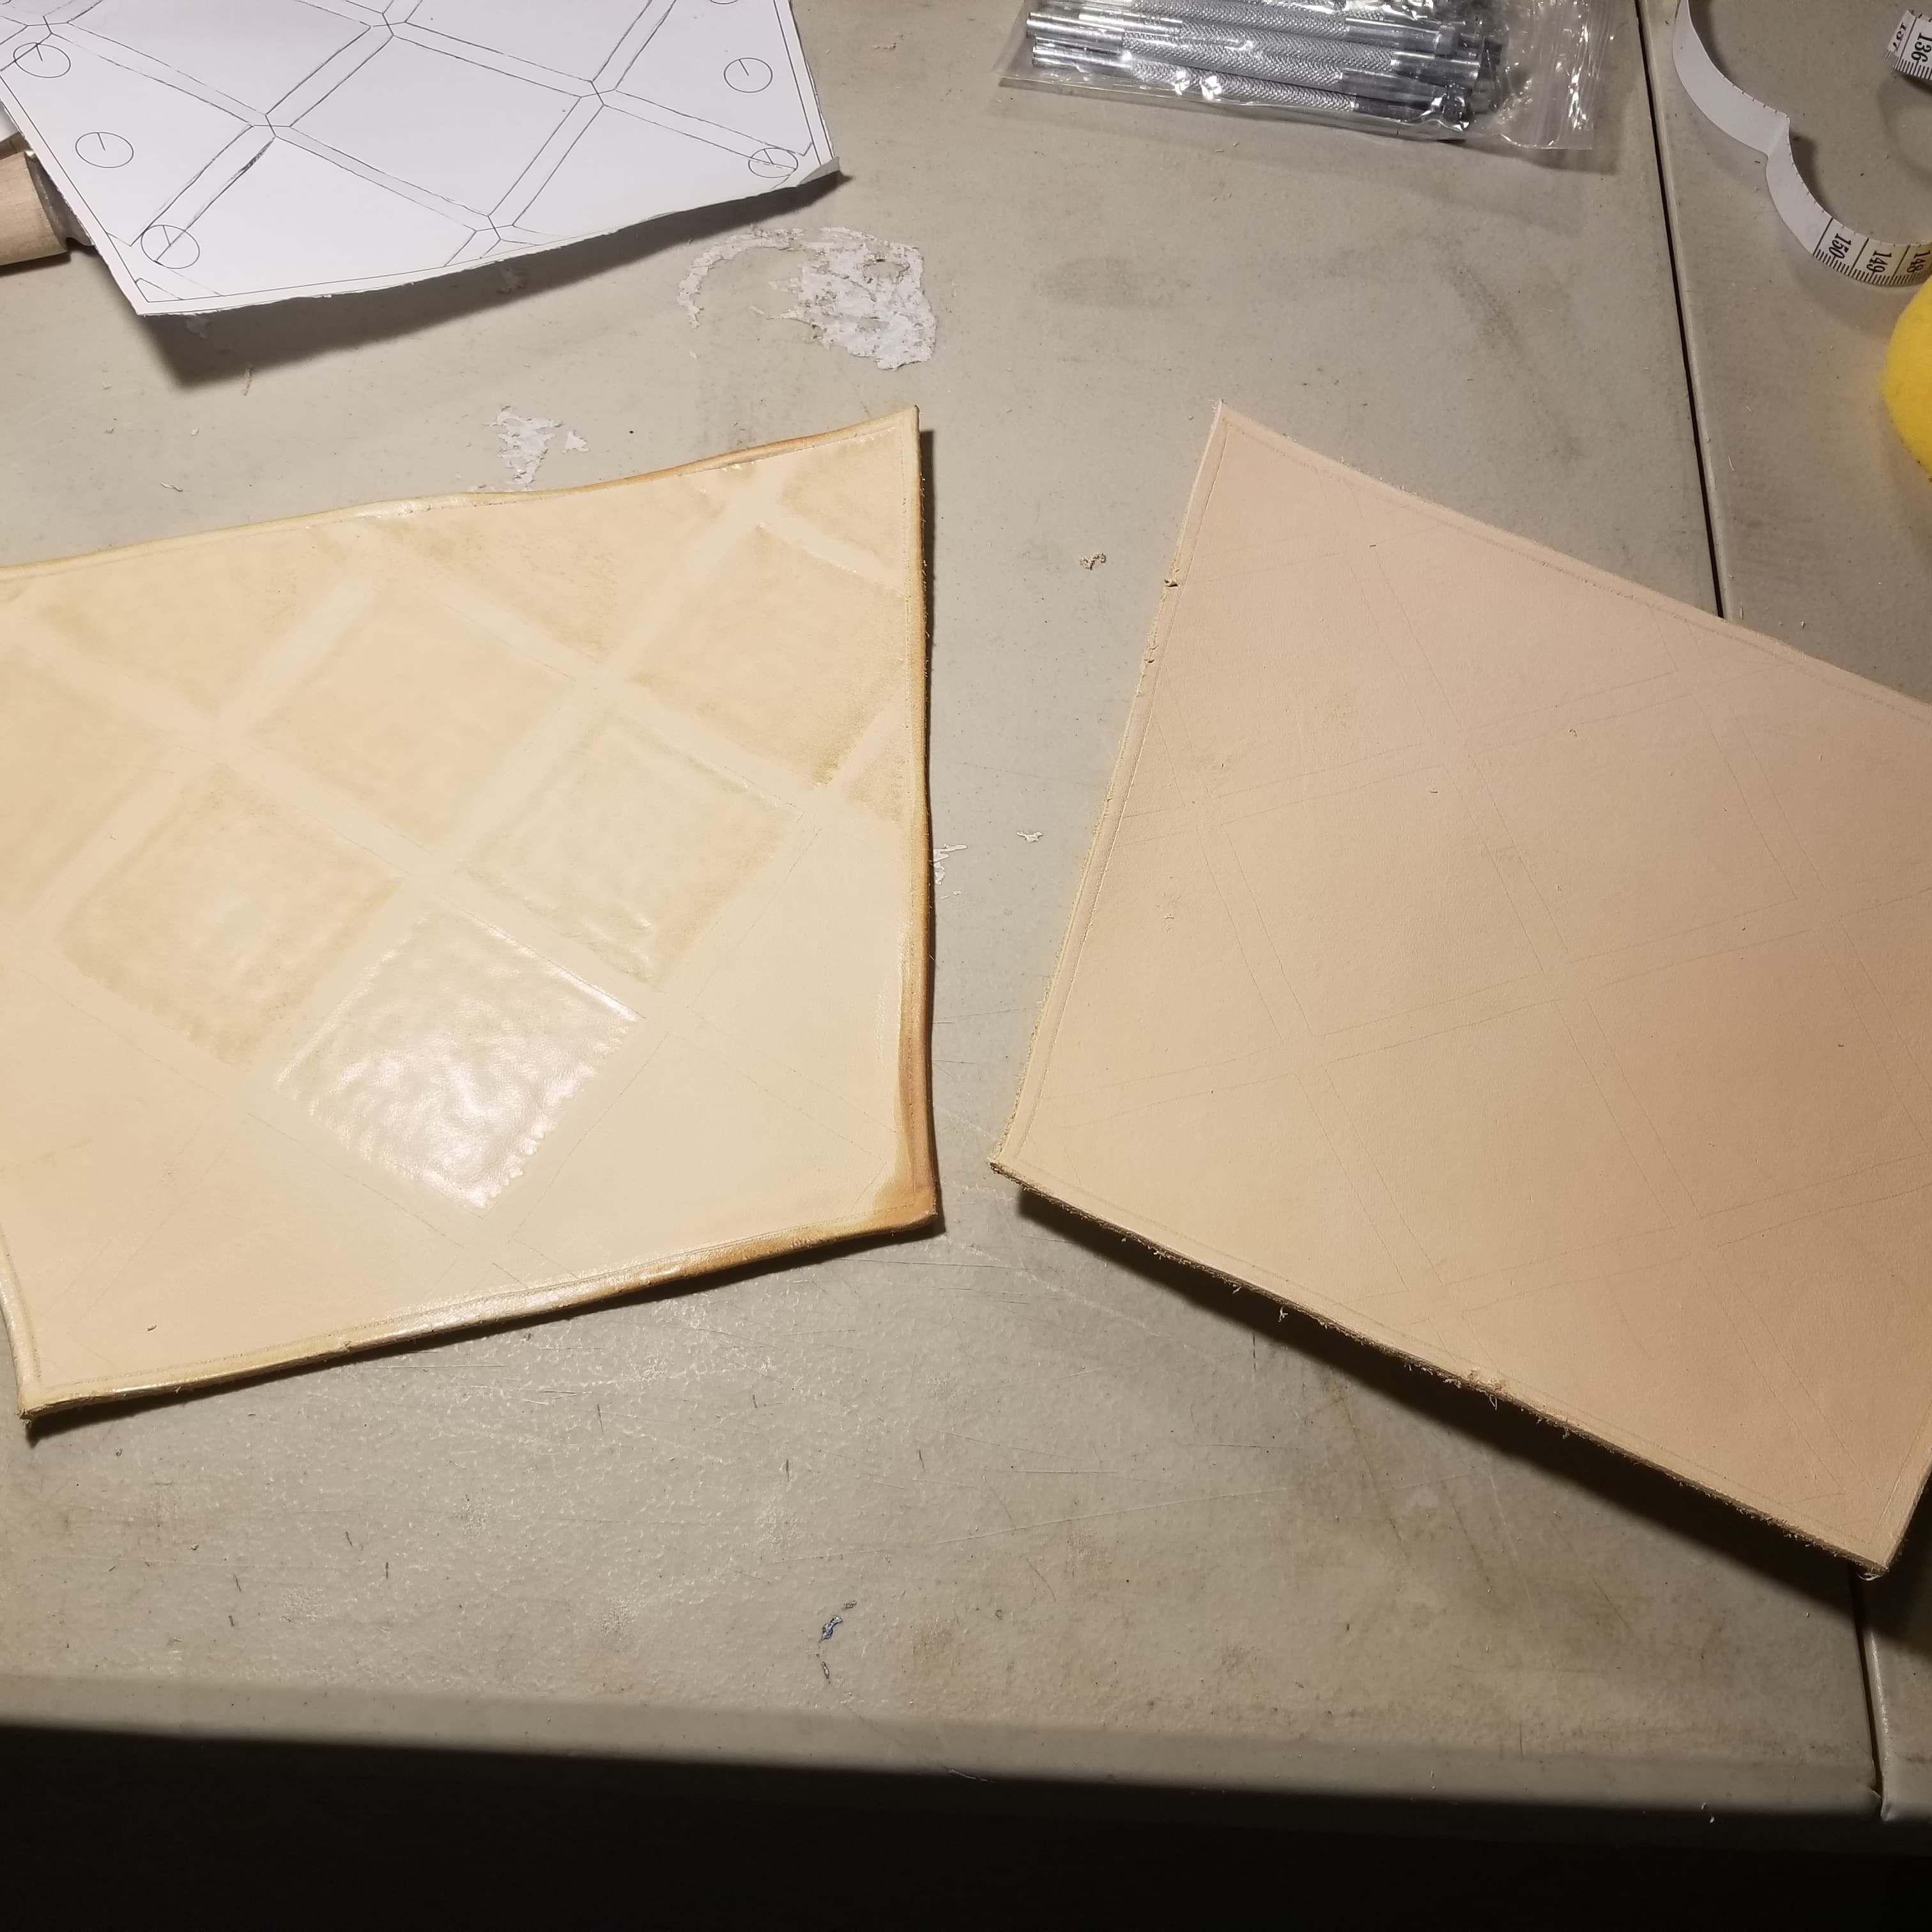
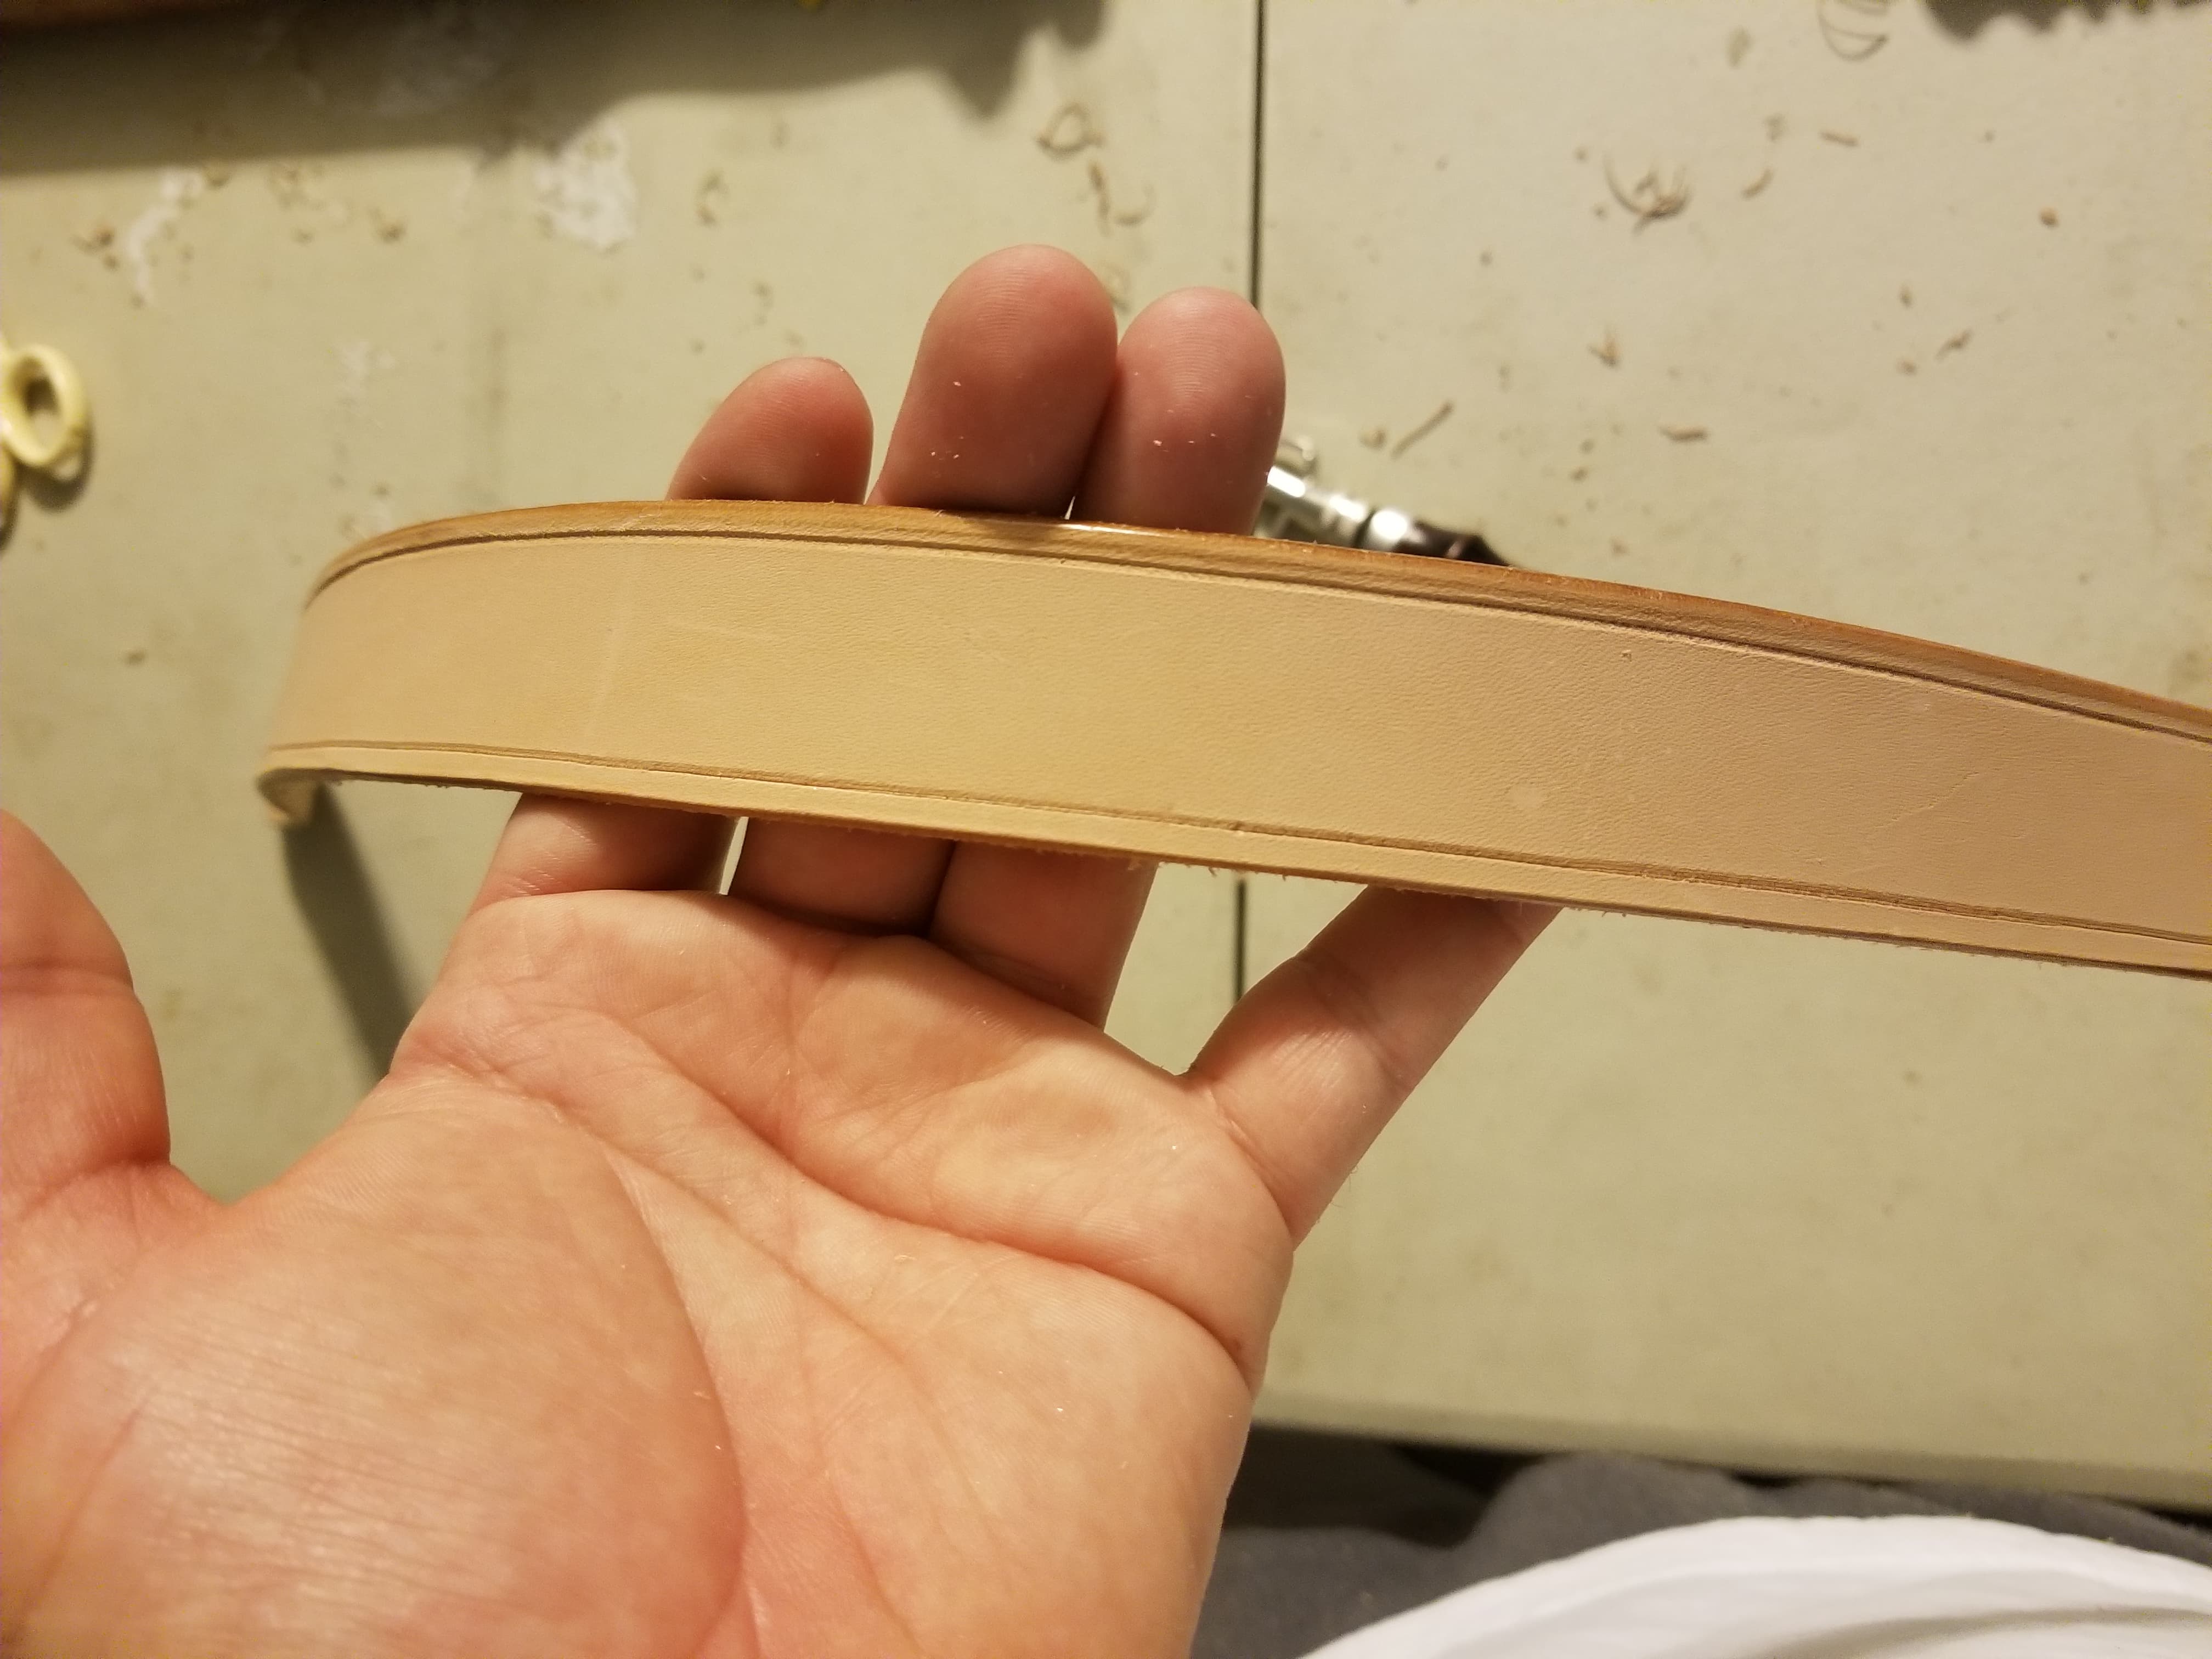
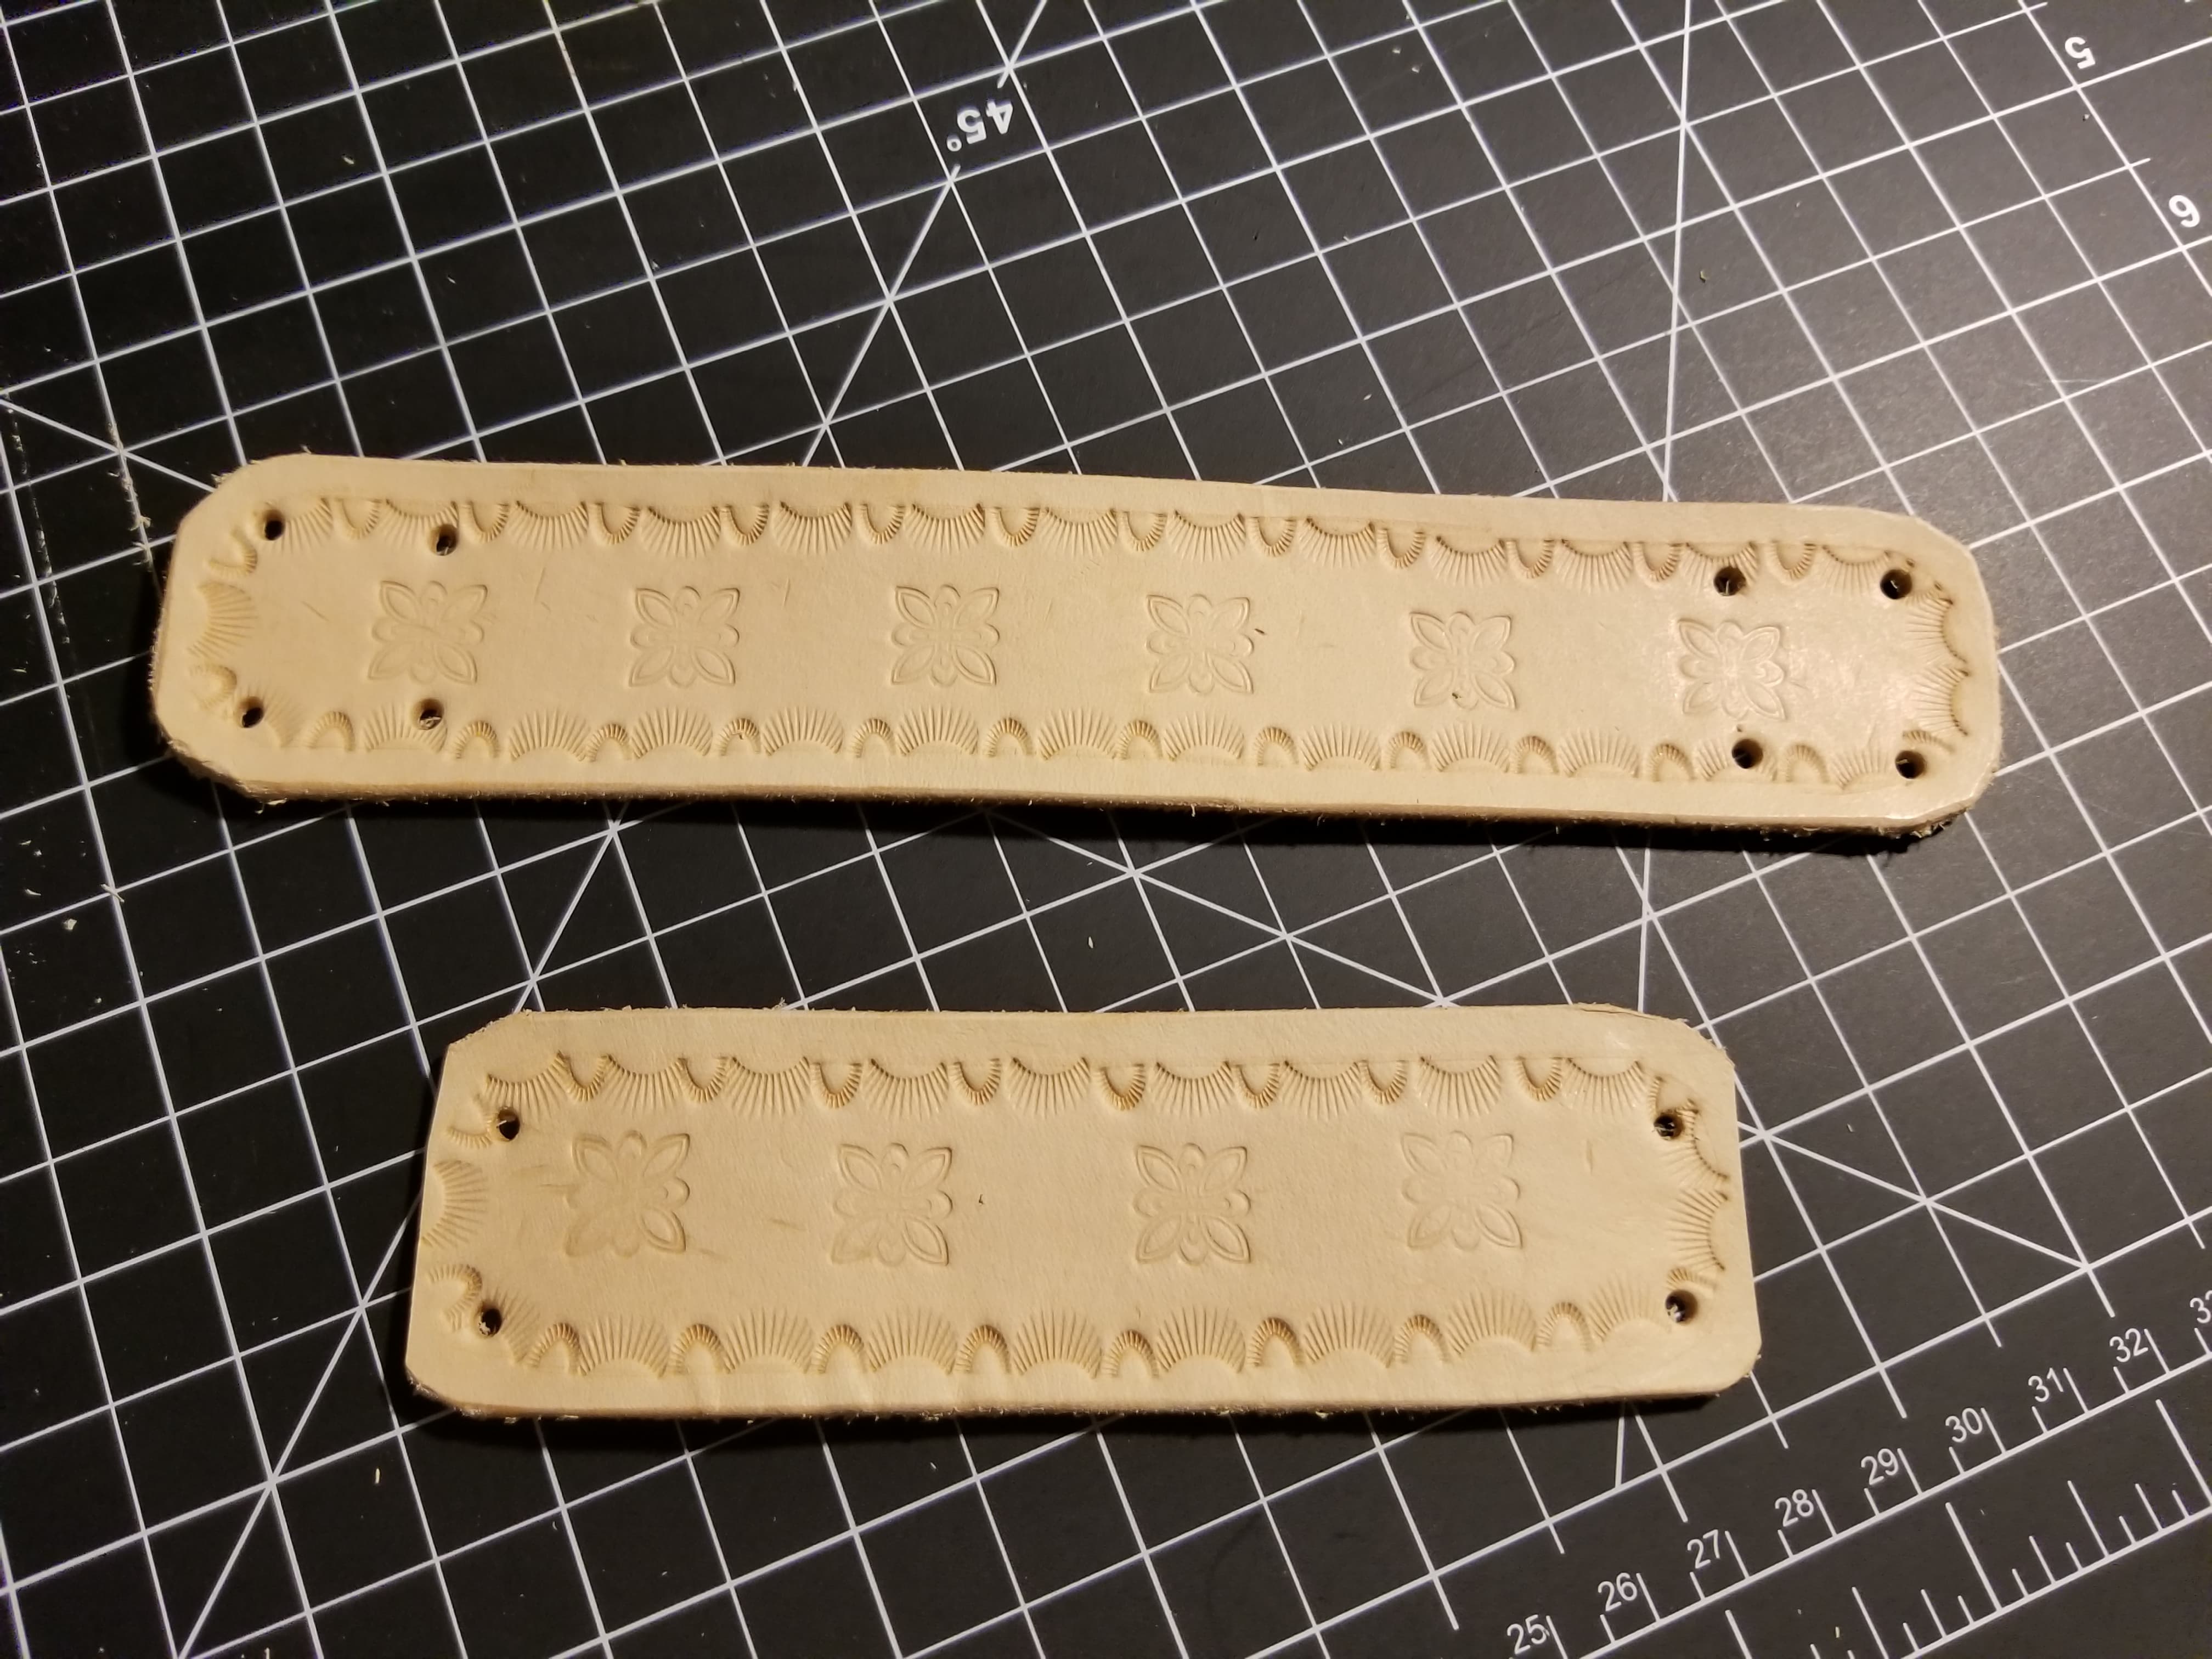
Now, a project that I am still working on. Bracers. This one, I tried to be a little more diligent when making them. I drew up a pattern on the computer, figured out exactly where I want my rivets and eyelets rather than just eyeballing them afterward. I imprinted stamping to create the subtle 3D look to create the strips rather than cut them out and glue them on. This took a lot of effort. I’m in the process of dying them now, hopefully they will be finished by the end of next week. I’m waiting for some red dye to be delivered.

Early stages of the bracers, my drawn pattern.
Dying the bracers dark brown

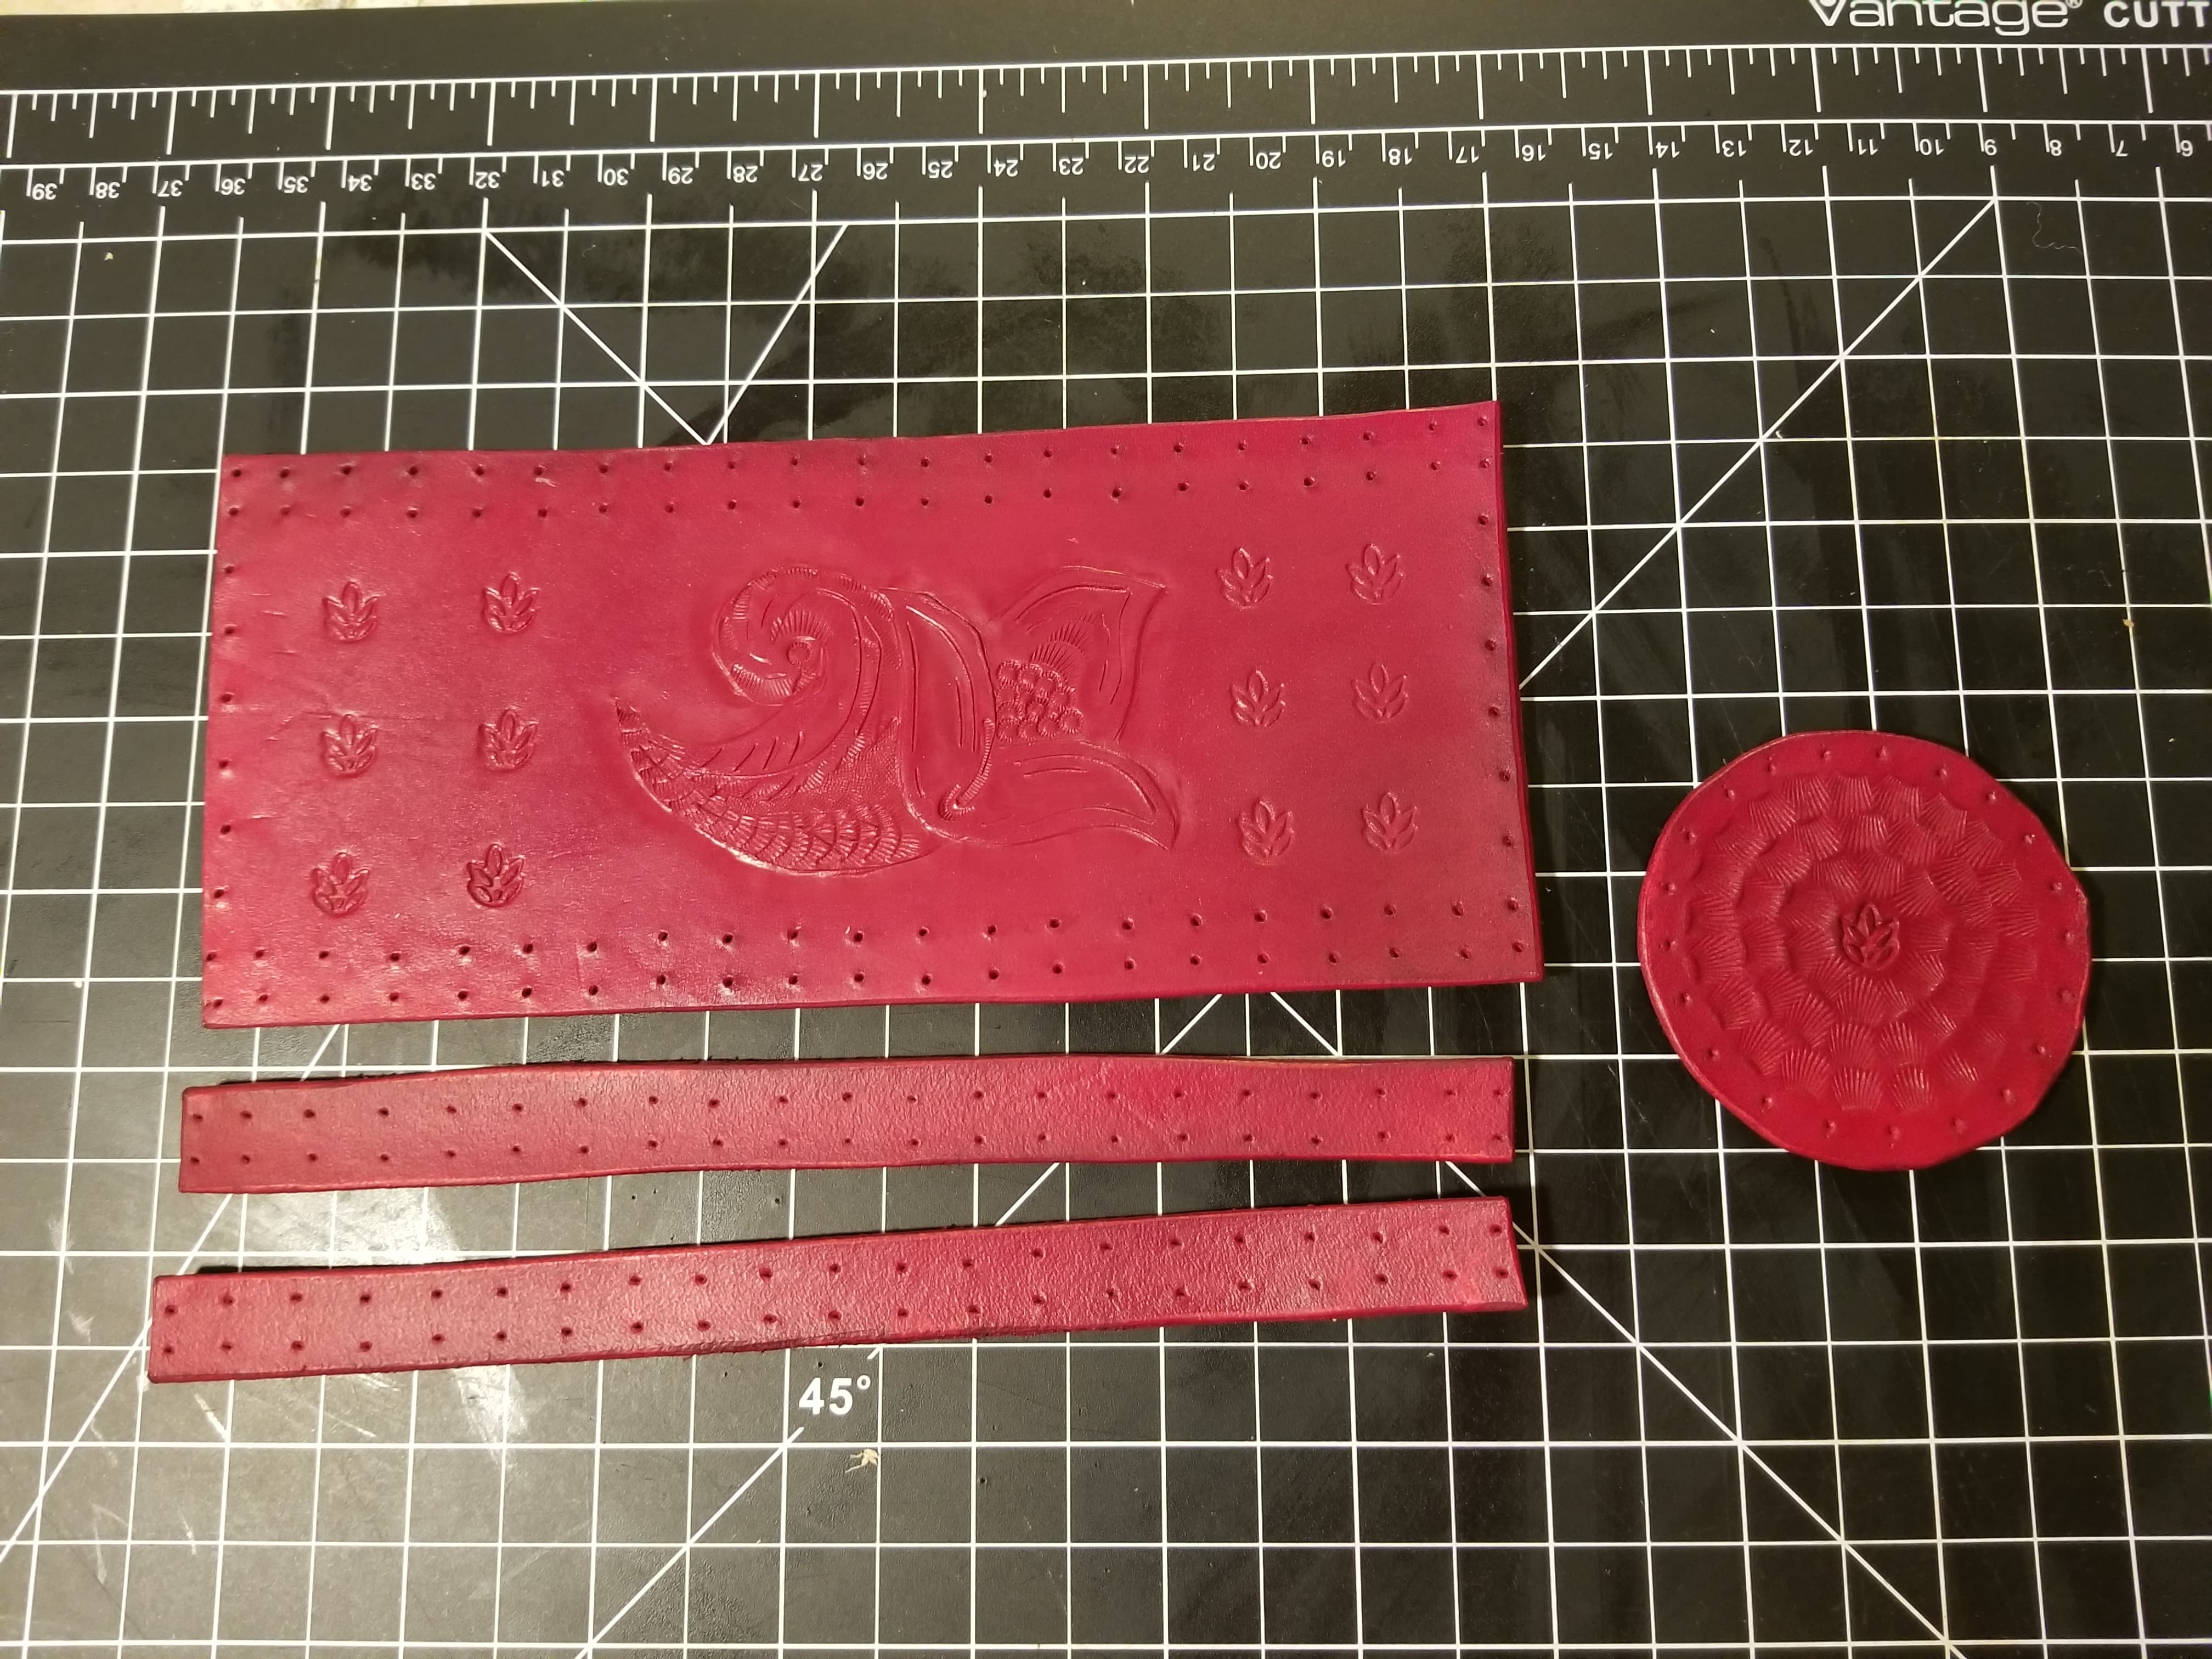
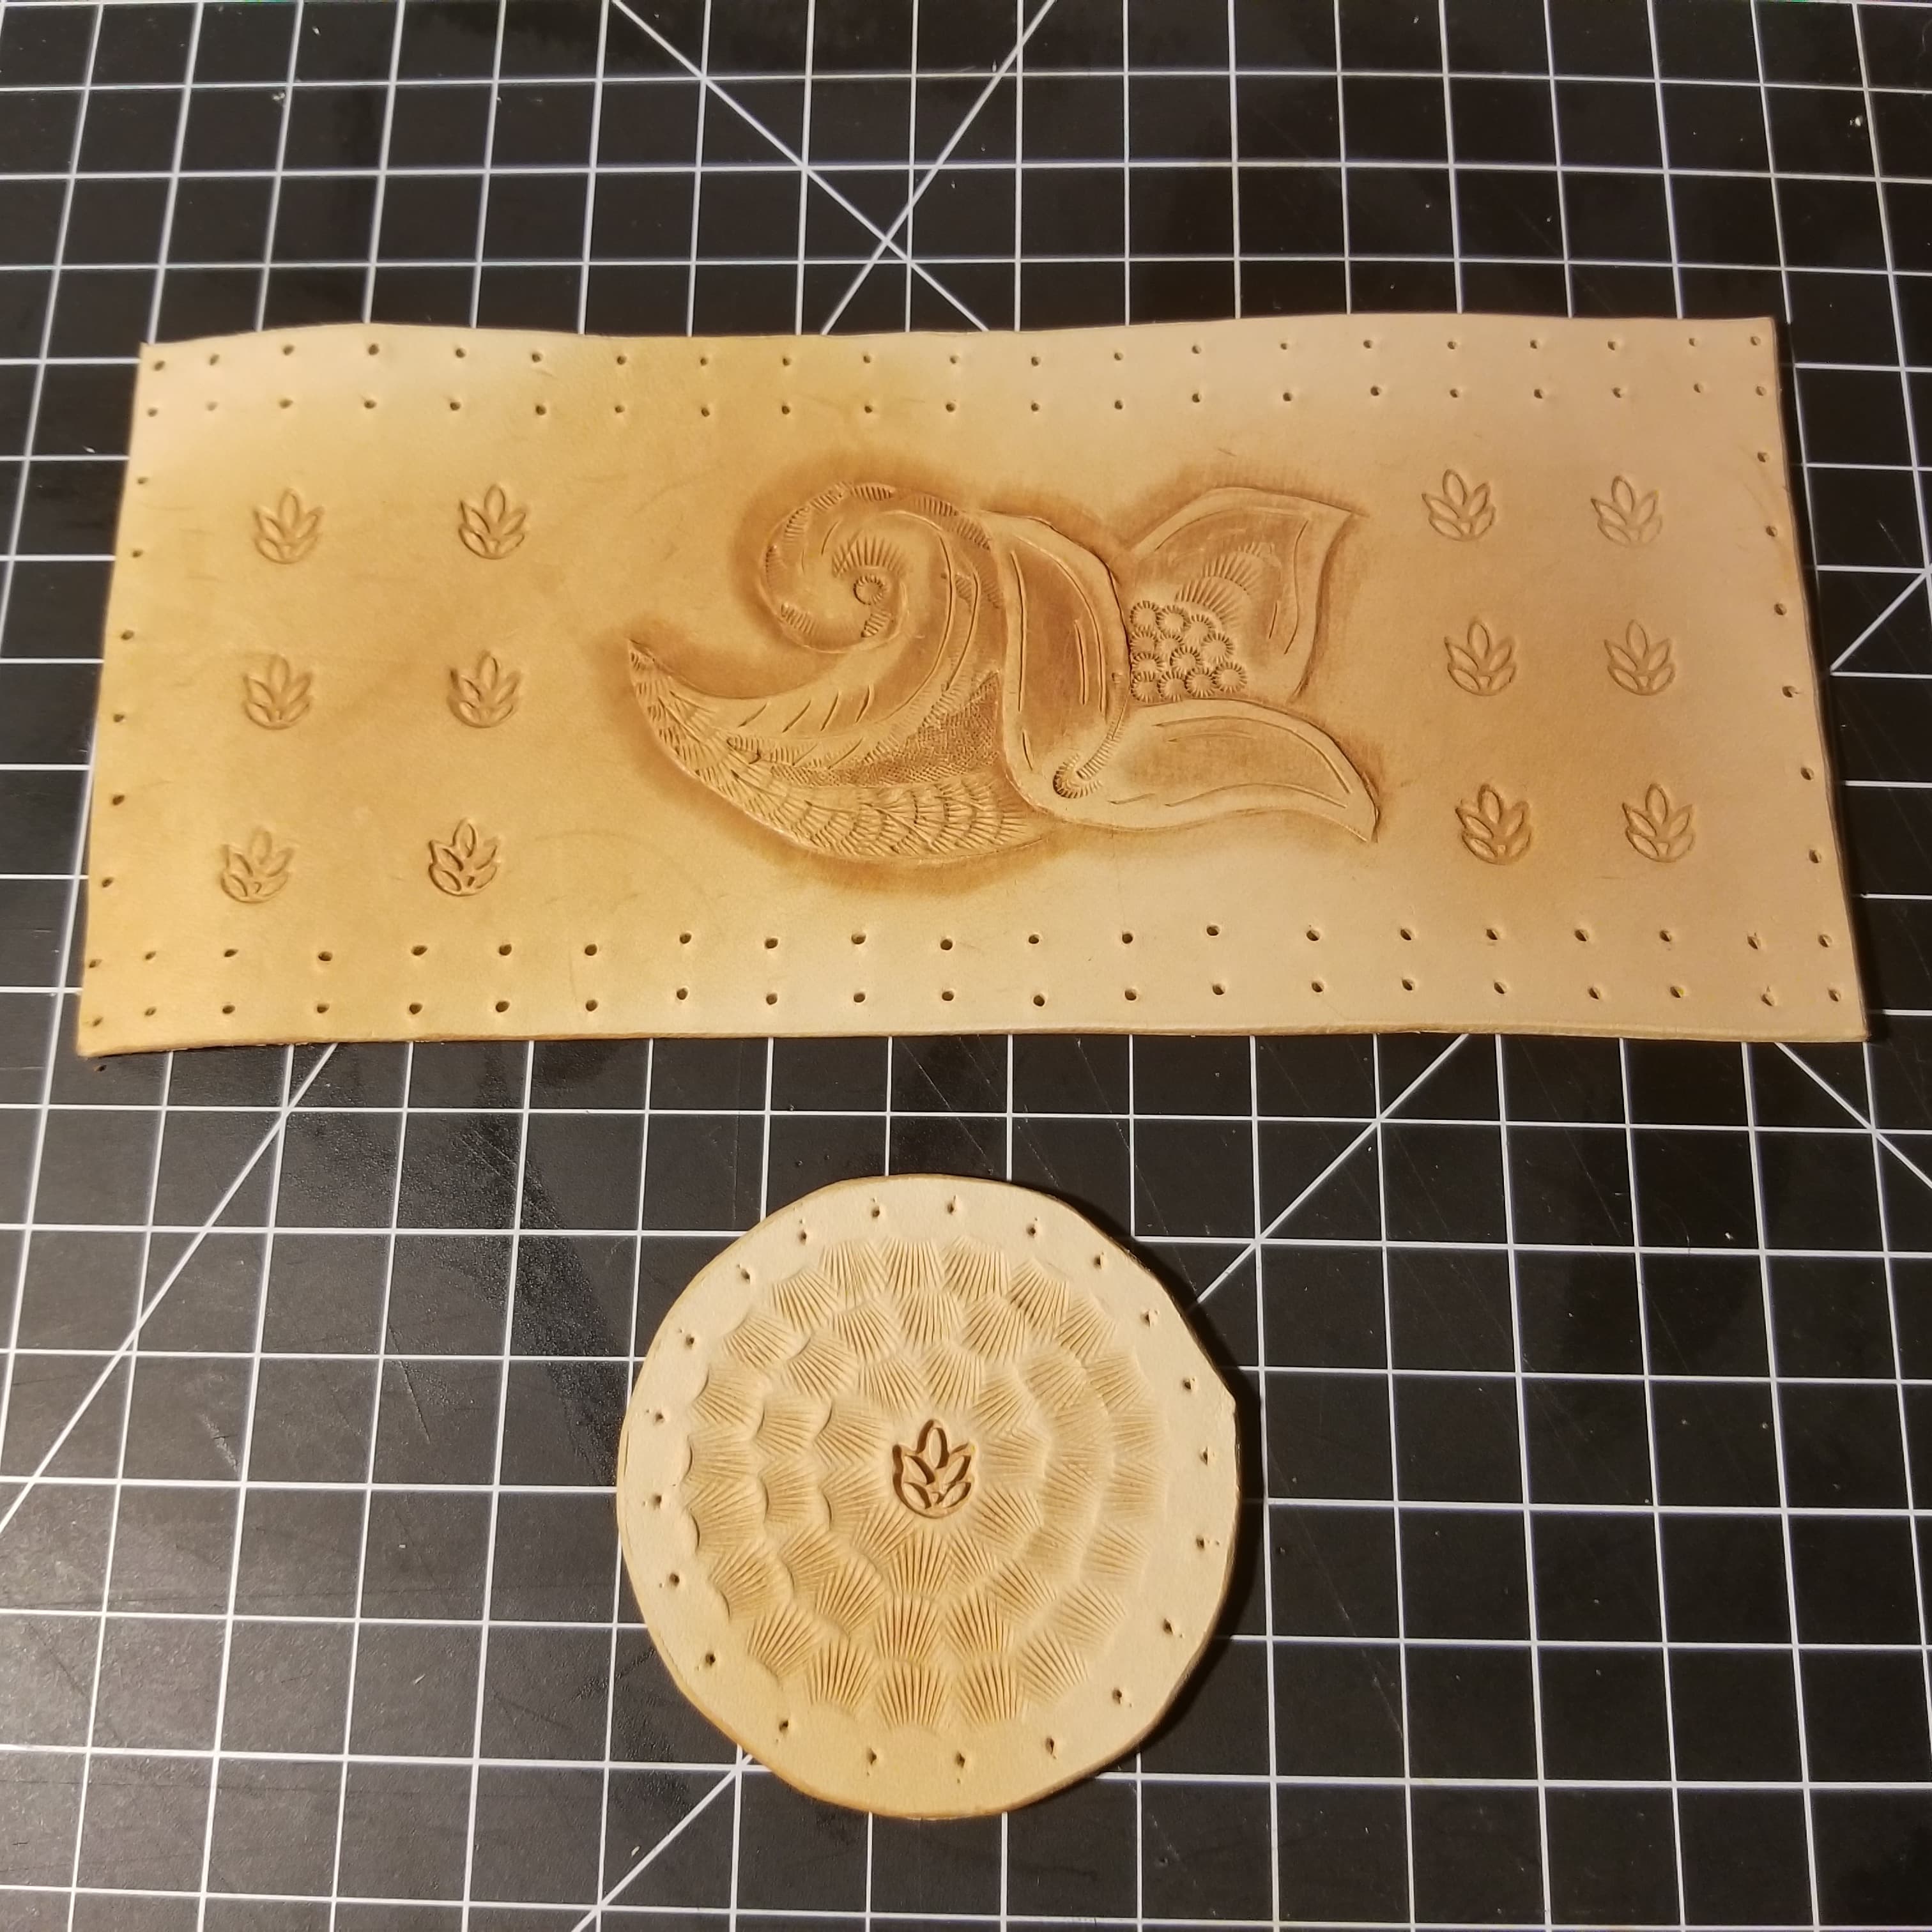
And now, my latest project. A holster. The holster could be used to just about anything, but I am designing it to at least hold a hatchet for when I go camping. It is very simple, the longer piece to slip onto a belt, and a smaller circle piece to just slide the handle of a hatchet or anything into. I once again added a border with stamps, which I kind of love doing now. Punch out holes where I plan to put my rivets. All I need to do is dye it, though I am unsure which color to dye it now that my dark brown is gone. And snap in the rivets and it’ll be done!

Pattern of the holster
Holster pieces cut out

Now, what is up with my plans for the weekend when it comes to leather crafting? Well, last night after work I stopped by the local ‘Tandy Leather’ store and signed up for two classes this Saturday. One about how to do the Sheridan style design, and one how to upkeep your tools. So there’s that. As well I hope to finish the holster this weekend (I need to buy some dye for it though). And possibly get close to finishing the bracers. AND, start a new project, though I do not know what yet.

Dice Cup and Leather Bracers

So, the red dye finally came in the mail today. Which is what I’ve been waiting for to progress on the dice cup and leather bracers. With the leather bracers I needed the red dye to paint the strips as you can see below. After that I added rivets. The bracers are nearly done now, all they need is to punch holes on the sides and add eyelets. The only reason it isn’t done right now is I need a bigger eyelet setter. Once I buy a 1/4 inch eyelet setter this weekend, it will be finished with paracord rope.

Bracers

The dice up is nearly finished now that I have my red dye. All that is required is to stitch it all together, which will take time as it is now my most ambitious project that requires a lot of stitching. I know that isn’t saying a lot. But stitching is one of the least things I’ve worked on during my short period of leather crafting so far.

Red dice cup

Oh, and I’ve started my work on my next project, which will take a long time to finish I think. It’s a helmet! A generic super villain helmet, but I will add my own designs/stamping to it. I got the design online, and have cut out and taped it together and the paper model fits me, so I am hoping the finished leather one will fit me too.

The weekend

This weekend, I started by going to two classes at Tandy Leather on Saturday. They were both definitely helpful! Especially the first of the two classes. The first one was about Basic Carving and Tooling. This class taught me the Sheridan style. Essentially a way to combine carving with the swivel knife and using stamps to make it pop and add live to the design (see first image).

The second class was Introduction to Leathercrafting Tools. This one simple just went over each tool commonly used in leathercrafting and what they do and how to upkeep them, with sharpening, etc.

Now, the projects I’ve worked on over the weekend. The most recent that I was working on yesterday was a dice cup. I got the pattern off of reddit surprisingly. However, I added my own flower carving, and stamps to it to add some pop. I am really happy with how the bottom of the cup turned out.

Dice cup side and bottom. Top portion includes the Sheridan style carving/tooling
All the leather pieces cut out for the Dice Cup

The other two projects I completed over the weekend were a holster, and a small keychain. The keychain was pretty easy, I made my own layout and design for it. I added a few stamps, dyed it Saddle Brown and stitched along the edges to combine the two parts.

The holster was a bit trickier, I previously cut out the pieces and stamped them last week. This weekend was just dying, and riveting the pieces together. It was the first time I’ve dip dyed anything. At first while it was drying it looked great, but after it dried the two pieces looked different colors. The bottom piece was darker than the top. It may have had to do with possibly leaving one piece in the dye longer than the other. But I wasn’t too happy with the outcome. The holster can hold things such as a hatchet, hammer, etc.

Holster on the left, Keychain on the right

I am still waiting on the Red dye to come in the mail before I finish off the bracers I’ve be working on.

A small tip I received while at Tandy Leather. I used to use water to burnish my edges but I wasn’t too happy with the results I was getting so I asked if there were anything to help with that. They recommended Gum Trag and it has been working great since I’ve gotten it. My edges have never been smoother since I started using it.

Gum Trag, for burnishing edges.

Quick peak of my work bench. It is messy but it is being cleaning up and organized today.

Work bench

Bracers (cont)

A continuation on the bracers I’ve been working on. I decided on a simple pattern of the intersection strips. However, instead of cutting out pieces and gluing them on, I thought I could just use an impression stamp and stamp around the strips. After it is said and none, I don’t think that is the greatest idea, however I am committed to doing it that way for this project now.

Pattern with the intersection strips. I drew this up on the computer really quick.

It took decent amount of time to stamp in the impressions, a lot longer than I would have liked. It also was much more tiring that I wanted. Constantly hammering with my mallet took a toll. Next time I think it best to cut out strips and glue/sew the pieces on. It wouldn’t be so tiresome and it probably would look better too.

The stamped impressions mid-progress on the left

I started to dye it last night as well, no picture taken of that yet. I used Fiebing’s dark brown die. I originally was just going to dye the impressions dark brown, and then the strips with a dark red. But it wasn’t working the way I wanted so the entire piece is first dyed dark brown, front and back. I think afterward’s I’ll go through and dye the strips red, on top of the brown. I have no idea how it will turn out, I think not so great, but I am going to give it a try none-the-less.

The two pieces are currently laying down flat underneath an old college text book to prevent curling while it dries. Probably the most expensive weighted press I could buy (ha, college joke).

I don’t necessarily have an idea of what project I want to work on after the bracers just yet, however if you have any ideas, I’d love to hear them. I’ll be going to the local ‘Tandy Leather’ shop in the area for the first time in the next couple of days, hopefully I can buy some better tools, primarily a better mallet, edge beveller, and a marble/stone block for stamping. Maybe I can get some ideas for the next project while I’m there. Oh, and they also offer two classes each Saturday I may attend. They have ‘Basic Carving and Tooling’ in the morning, and ‘Introduction to Leathercrafting tools’ in the evening.

Bracers!

I thought about my next project I want to work on for leatherworking. And in the past, whenever I’ve got to a renaissance/medieval faire, I’ve always wanted to buy some leather bracers made by one of the shops.

So, I want to make some bracers! That way I can wear them next time I go, as we go yearly and I won’t have the temptation of buying one! I think the craft process will be similar to the cuffs I made earlier, just bigger.

I made a pattern and printed it out for my design as you can see below. The leather I am using is the 6-8oz veg tanned leather I bought from Hobby Lobby earlier in the week.

Pattern and piece of leather cut out

Leather belt finished!

Finally, I finished my first project, a leather belt! I’ve been working on it since day 1. If you remember, I ordered two 1.25″ leather strips on Ebay to make some belts. I’ve only worked with 1 because I want to make the other later on to see the difference in my progress as a leather crafter.

Anyway, I’ve edge beveled, burnished, stamped, dyed, finished, added rivets and a belt buckle. For the most part I was able to get most of it done right away.

I’ve been waiting on getting the rivets, finish, and belt buckle for a bit now. I ordered some belt buckles online and they came in the other day and I didn’t like them so I went out to Hobby Lobby and bought one I like there, as well as a Finish.

And with that, the belt is done! Take a look at the picture below, you can see the stamps I added, the dye color of dark brown, and it has a slight sheen on it thanks to the finish. I am a little worried the rivets are a little short but it seems to hold well.

Can’t wait to make more belts in the future! But for now, I think the next project I’ll be working on is some bracers/arm guards.

Before/After picture of finished belt

Leather Cuffs

So I was sitting around wondering what kind of project I should work on now. I can’t finish up my leather belt yet, I am still waiting to get some leather finish to coat the dye, once I get that I can finish it.

So I was looking through some of the scrap leather bags I got from Michael’s, and there were some decent sizes of black in there. I decided I could practice making larger bracelets/cuffs, since I do want to make some good arm guards eventually. Cuffs would be good practice. So I drew up a quick pattern on some paper on the size, and where I can punch wholes and set rivets, etc.

The rivets were pretty easy, I already had those so I punch a small whole, set the rivets, then used a rivet setter and mallet to finish them.

I put a few stamps into the leather but they really don’t show up at all unless you are looking for them and are pretty close to the leather.

Top half of the cuffs with rivets, and pattern in the lower left corner

Now I had to figure out how I want to tie the cuffs off in the back. I originally tried to just punch holes and use some thin pieces of leather but it wasn’t working as I wanted. So I though of other options and settled with what most leather workers already probably know and thought it was trivial. Eyelets and Paracord. Eyelets to make the rope move much easier for tightening and loosening, as well as not damage the leather wholes each time I put them on. And paracord because they are really cheap and easily get the job done.

Back side of the cuffs. Eyelets and Paracord.

A bracelet finished! And more work on the belt

I bought a few extra items from Michael’s

yesterday. I bought a new cutting knife, a mallet,

and two bags of scrap leather.

I was able to make a quick, rough first bracelet

using the scrap leather I got. It was quite thin so

I think it must be 3oz at most. I initially cut two

pieces out and realized I cut them way too short,

so I cut a new, longer piece out which was perfect.

I tried to add some stamps to it, but the leather

just wouldn’t take it very well. I even wet it down

a but before hand, but it didn’t absorb it as much

as I hoped it would. So the stamps are faint. I

also added 3 rivets to it to add some flair. To tie

the braclet on, I just cut thin pieces of leather

and used them as a rope on the underside.

As you can see from the pictures below, the

bracelet is a little rough, but for it being my

first complete project, I am very happy with it. It

will improve from here!

Now, onto the belt I’m still working on. I added

two different stamps onto one side of the belt as

you can see below. I plan to finish off the

stamping later today. I still need an oblong cut

for the belt buckle that I am waiting to come in

the mail. After I finish stamping, I’ll be able to

add some dark brown dye I bought and hopefully get

pretty darn close to finishing it.

My first project

I finally got my pieces of leather in. The 2 strips

I got are 7-8oz Veg Tan cowhide leather belt

blanks, 1 1/4 in wide.

I bought 2 since I am very new to leather crafting

I anticipate to make some mistakes as I start,

which I am ok with. I’m hoping at least 1 of the 2

belts will be somewhat decent.

I haven’t gotten my belt buckles or snaps in yet so

that step will have to wait, but I added some

detailing and punched the holes into my belts while

I wait for that.

For the most part I cut down one of the ends, did

some edge work smoothing out the edges, beveling in

a border, and punched some holes into one of the

belt blanks.

The beveler I recieved from the start kit isn’t so

great, it did the job, but was not consistent at

all, and it caused me to make some mistakes.

I’m hoping to get my belt buckle in soon so I can

finish the belt, though I am still unsure if I want

to sew the folded part back or use snaps. I am

leaning toward using snaps to secure the buckle in.

And I still need to figure out if I want to make a

belt keeper with any left over leather I have, or

install a metal one.

The border looks decent for a first try further down the belt.
Made a few mistakes when adding the border with the beveler. It’s a learning process!
Design a site like this with WordPress.com
Get started